
I tested the tools and supplies I trust when working on shingle and siding jobs — from pry bars that protect surrounding shingles to seam tape that actually seals under heat. These are the items I reach for on the ladder
I put these tools through real-world shingle and siding tasks so you get gear that actually performs on a roof or exterior wall.
My selection focuses on what makes shingle work faster, safer, and cleaner: tools that protect the row above, hold long boards hands-free, bend metal accurately, and seal seams that cause leaks.
I chose each item based on durability, ease of use on an actual roof, and how well it reduces trips, mistakes, or the need for a second pair of hands.
1. PacTool Gecko Gauge 8 in. x 3/8 in. D Plastic LP Siding Tool Green 2 pk STANDARD 3/8” Thickness for LP Siding – Best for Solo Installation
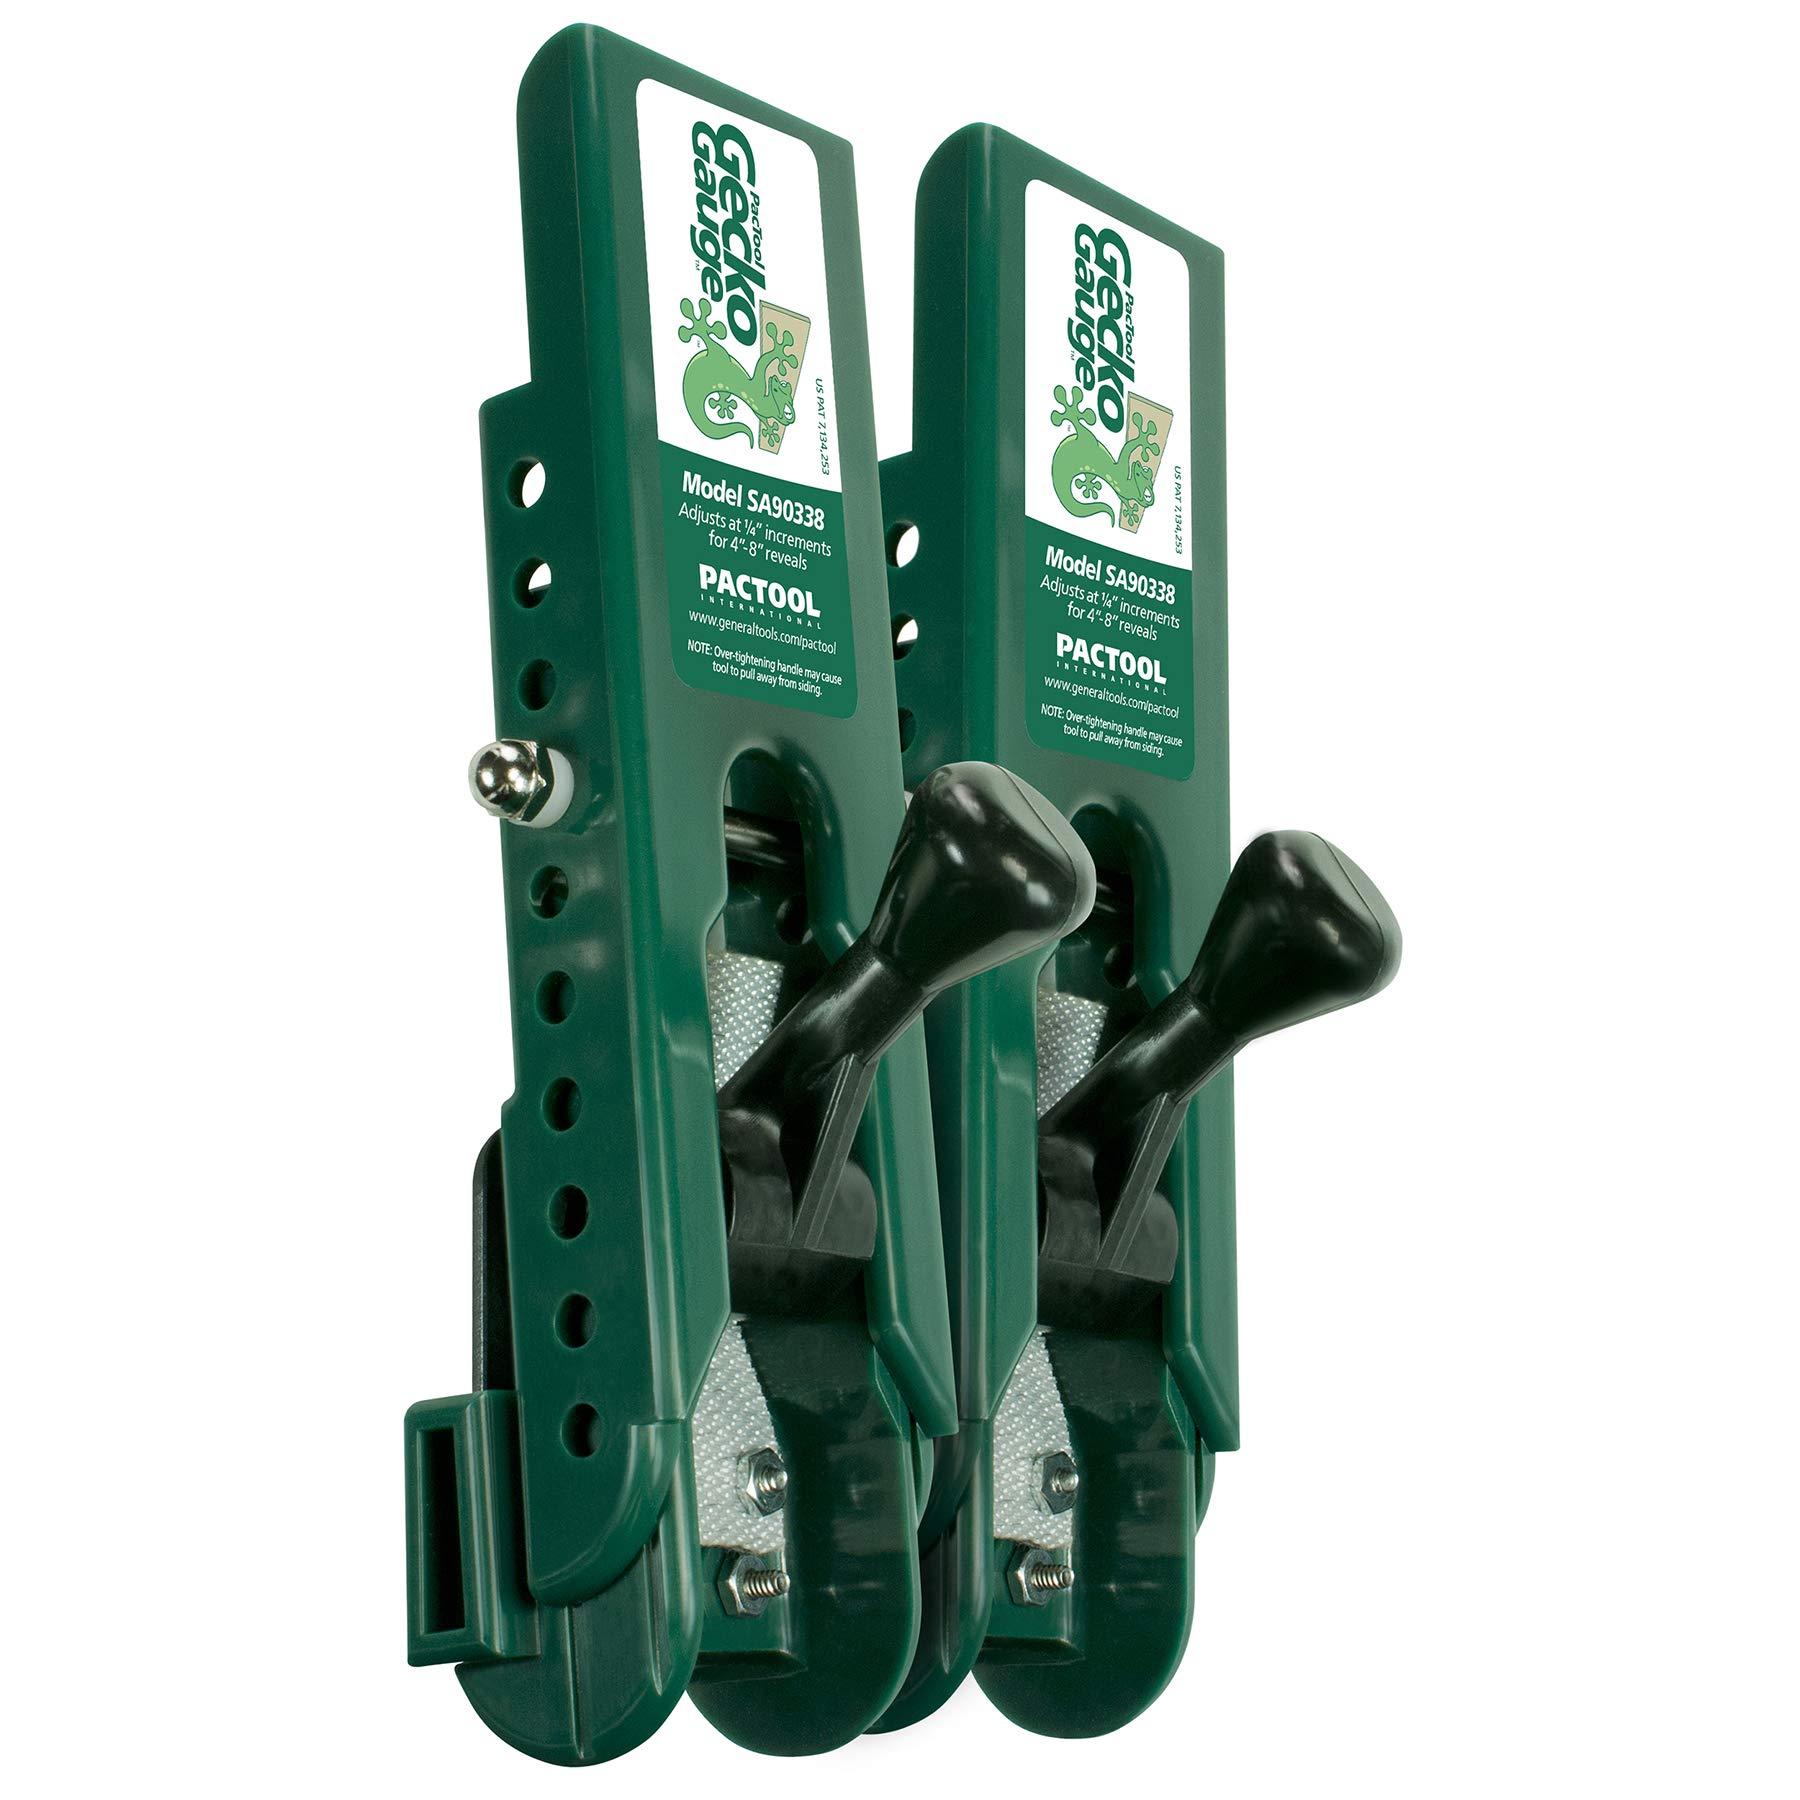
I use the Gecko Gauge when I need to hold long lap siding by myself and keep each course consistently spaced while I nail.
Why I picked it: Hands-free support and precise spacing for 3/8-inch LP or similar boards.
Best for: One-person siding installs and speeding up long-board jobs.
Affordable tool that replaces a helper on many jobs.
Pros
- Clamps hold 16-foot siding securely
- Adjusts in 1/4-inch increments
- Rubber grip won’t mar finished siding
- Speeds single-person installs significantly
Cons
- Takes a few pieces to master cam tightness
- Made for 3/8-inch thickness specs
My take
I put these gauges on while installing textured lap planks and they genuinely act like a second pair of hands. The friction-cam holds full-length boards so I can get each course level and spaced without wrestling the pieces.
Adjusting in quarter-inch steps for 4–8 inch reveals made layout simple; I could change spacing quickly around windows and doors. The rubber padding kept my pre-finished boards from scratching, which mattered on painted sections.
There’s a small learning curve with the cam: tighten too far and the tool rocks, too loose and it won’t hold. Once I had the feel, though, my pace increased and fatigue dropped—especially on longer runs where a helper would normally be required.
2. Malco 18 Inch Premium Sheet Metal Folding Tool, 3/8″ and 1″ Folding Depths, Made in USA, HVAC and Metal Roofing Tools (18F) – Best for Metal Bends
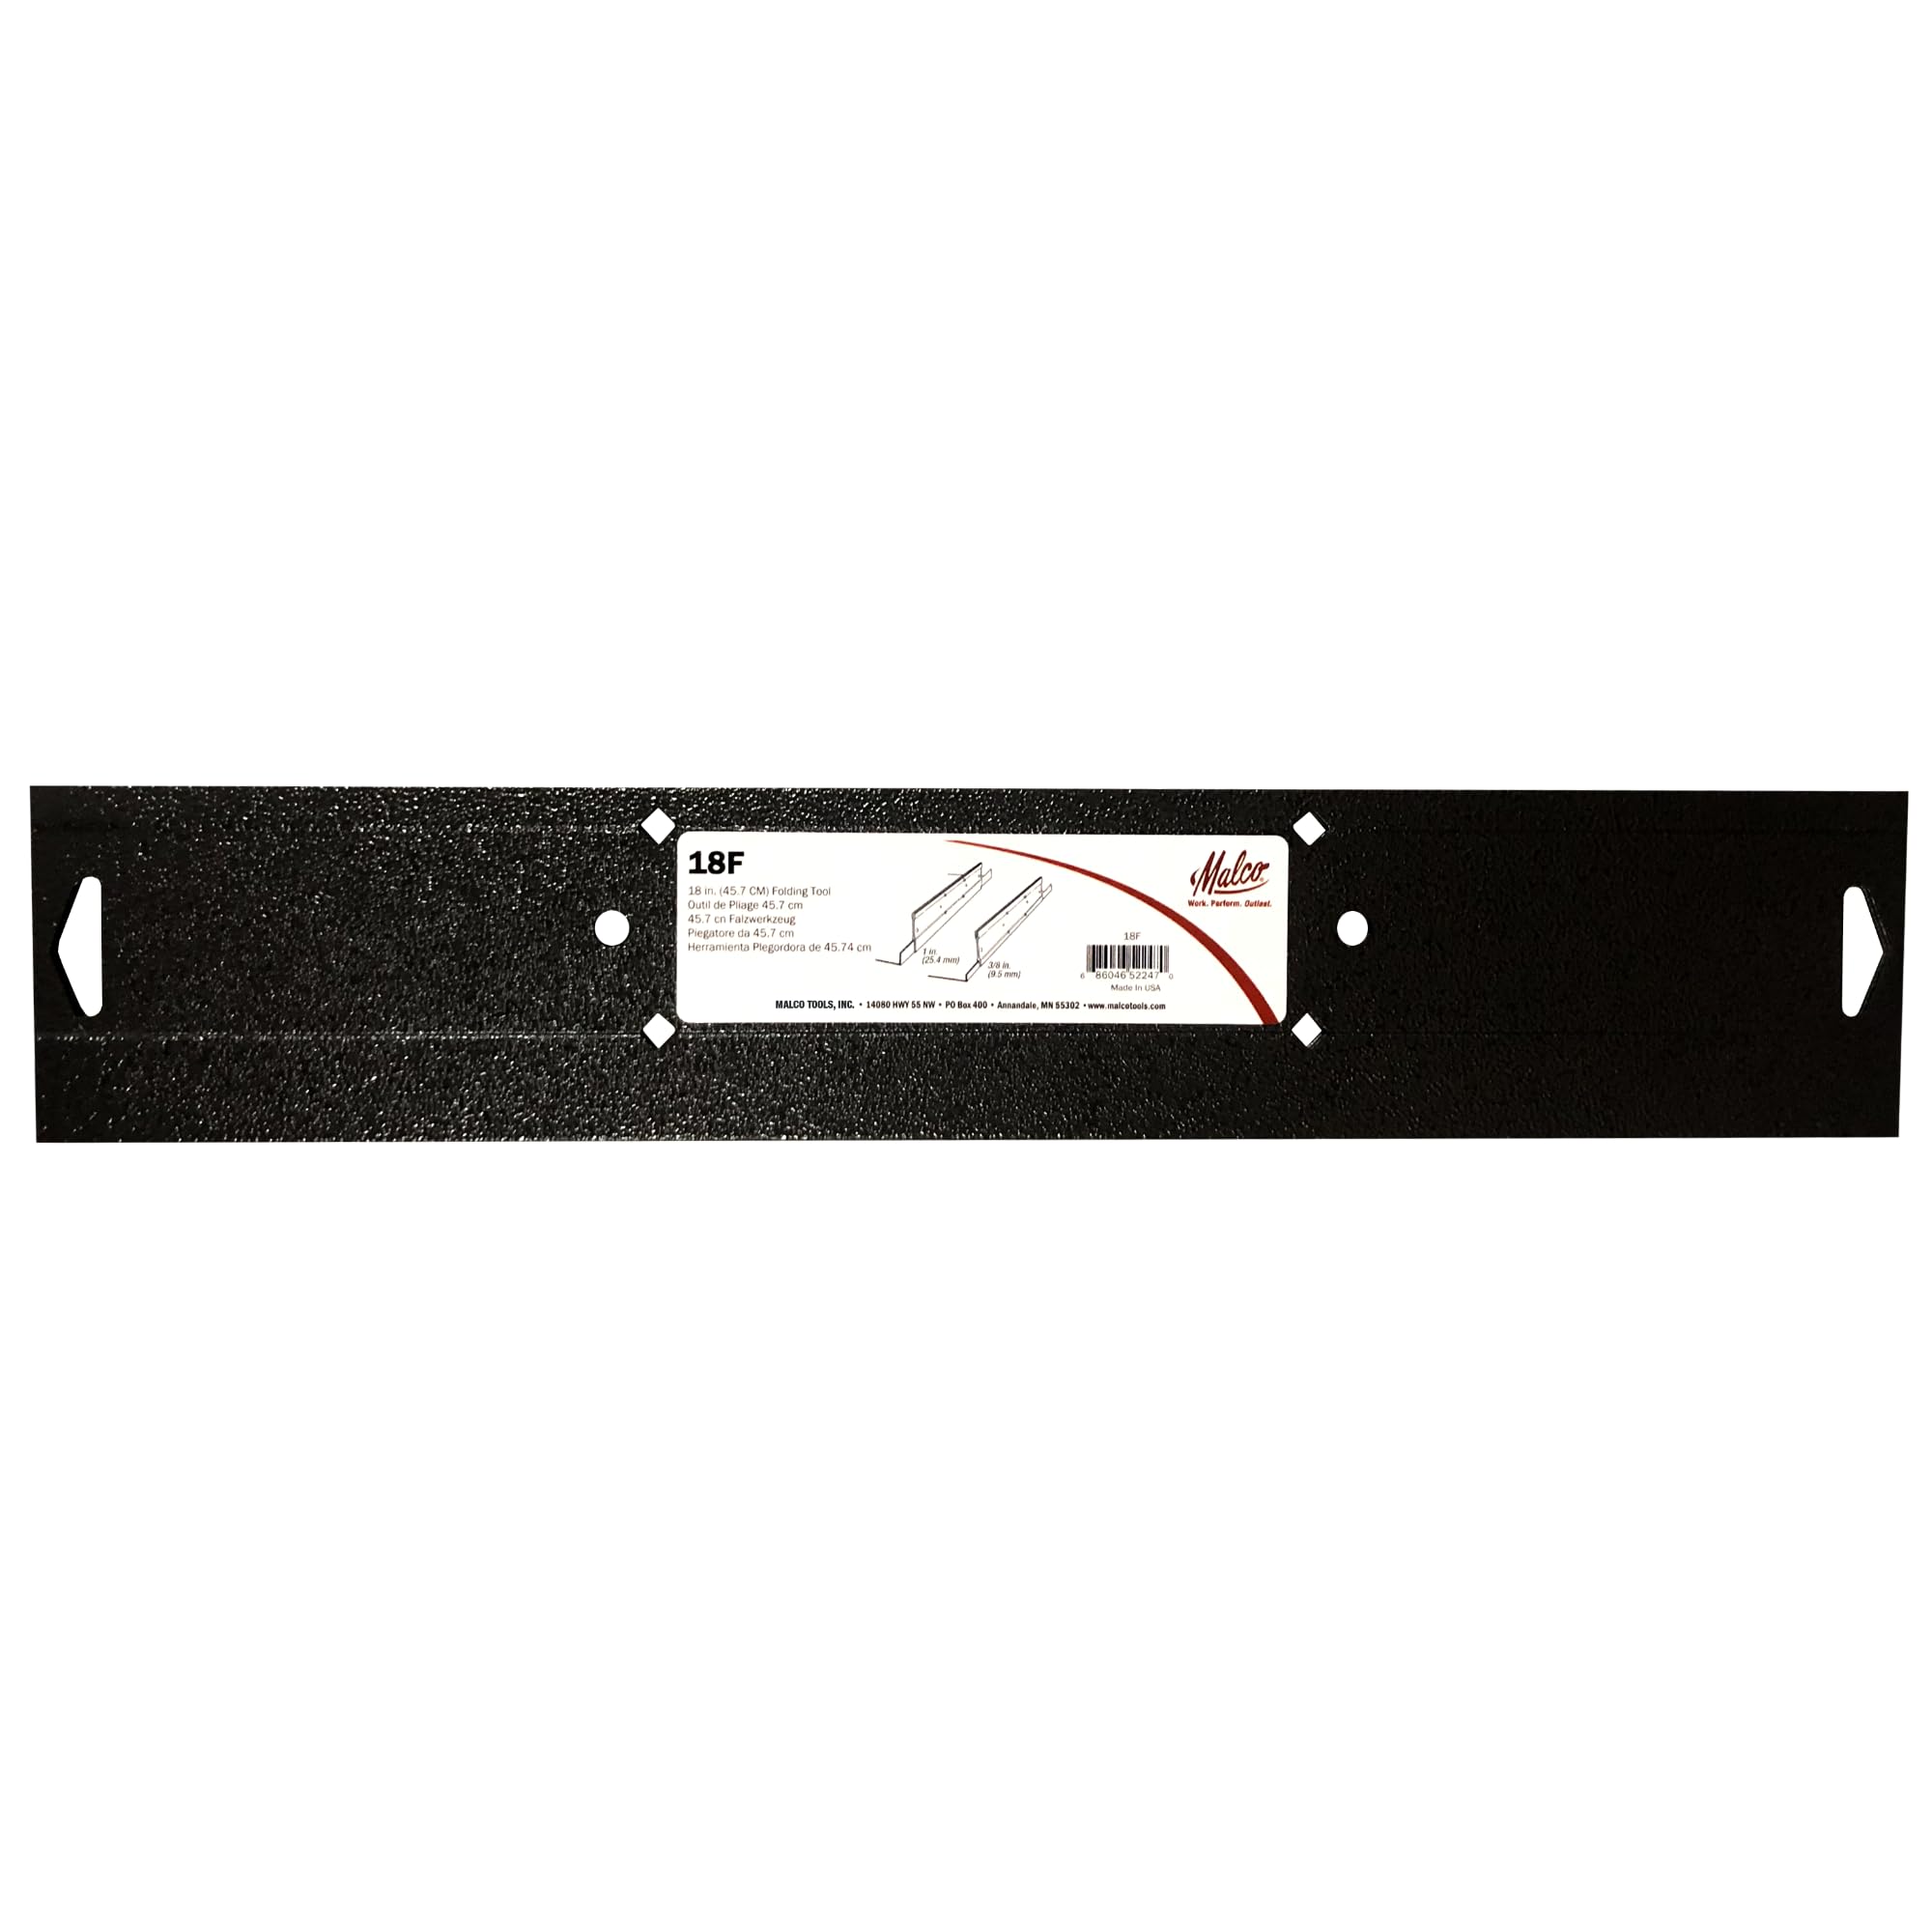
I reach for this folding tool when I need clean, repeatable bends in metal flashing or roof trim.
Why I picked it: Long, rigid halves and sight holes give consistent folds and alignment.
Best for: Forming hems, pans, and drive edges on metal roofing trim.
A solid, work-ready tool for pros and serious DIYers.
Pros
- Sturdy steel construction
- Sight holes for accurate alignment
- Longer length gives uniform folds
- Made in the USA
Cons
- Not ideal for very long continuous runs
- A little heavier than compact alternatives
My take
This folding tool felt heavy-duty from the first bend. The two steel halves stay true and the sight holes make it easy to line up depth consistently, which matters when fabricating flashing on-site.
I used it for several short runs of trim and hems; the longer 18-inch length helps produce straighter edges than shorter tools, and it held its shape after a few drops on a jobsite.
If you do a lot of detailed metal work around skylights or valleys, this is the kind of tool that saves time and gives a professional edge.
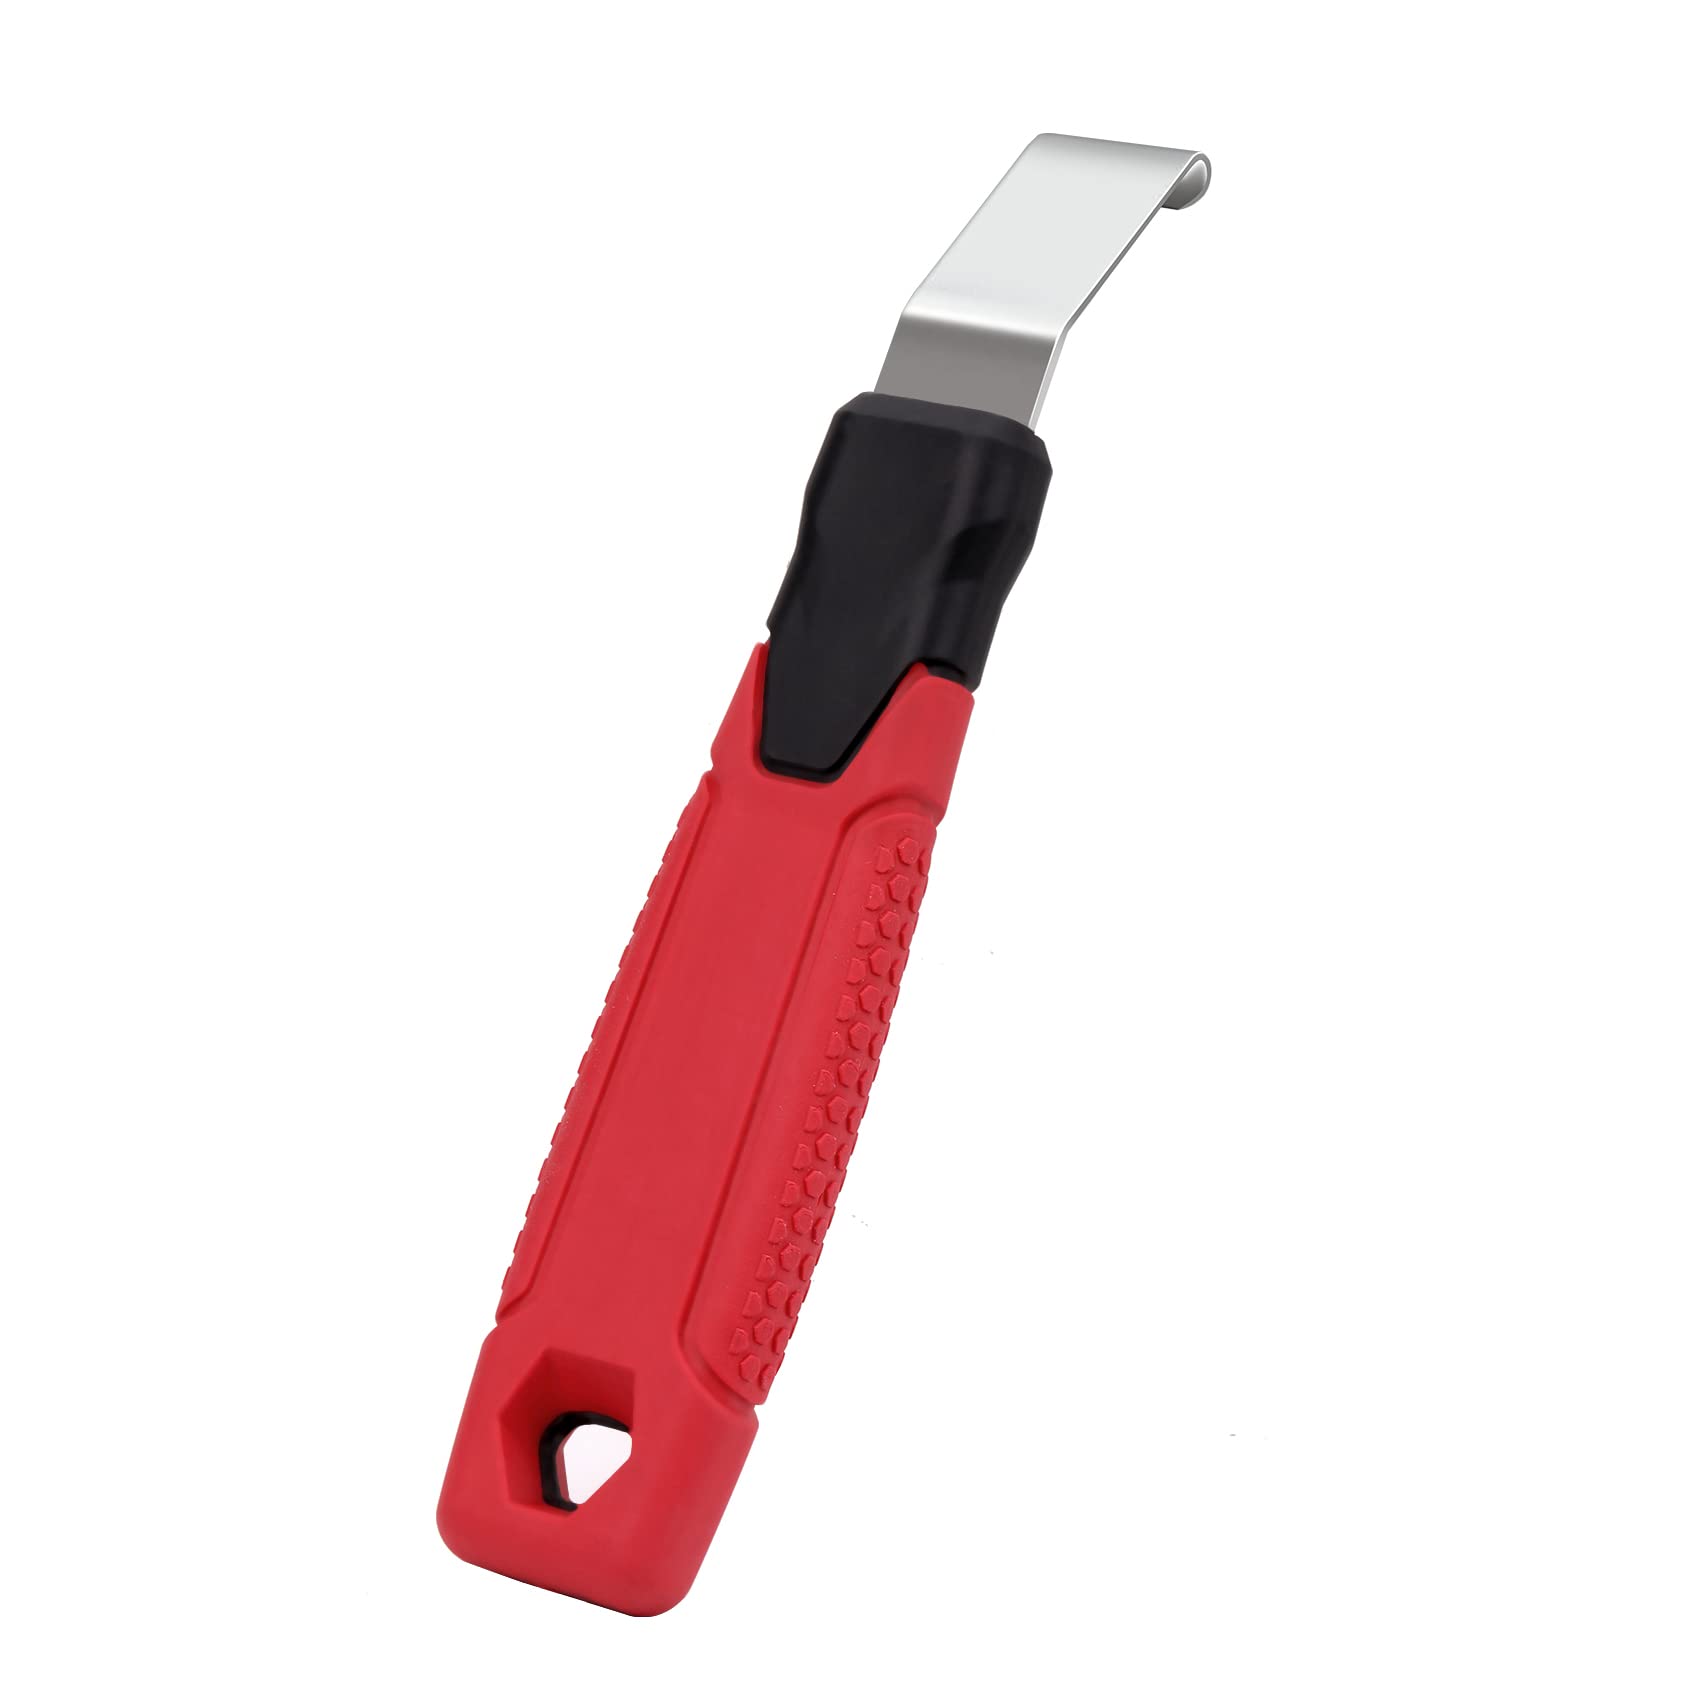
3. PacTool RS501 Roof Snake Tool – Shingle Pry Bar – Heavy Duty Nail Remover Tool – Roof Shingle Remover – Professional Roofing Tools & The Hillman Group 42041 Galvanized Roofing Nails, 1-Inch, 100-Pack Nail Pullers + Nails, 1-Inch – Best Pry Tool for Shingles
When I replace individual shingles I use the Roof Snake for accurate nailing and fast nail removal without harming the course above.
Why I picked it: Patented offset nail slot keeps new nails a safe distance from the row above.
Best for: Replacing 3-tab shingles and removing embedded roofing nails.
Midrange tool that earns its place in a pro kit.
Pros
- Forged steel construction
- Offset nail slot protects top course
- Claw removes nails without a flat bar
- Compact and handy on the roof
Cons
- Heavier than pocket pry bars
- Could benefit from a longer shaft for extra leverage
My take
I used the Roof Snake for a shingle swap and it made aligning the new shingle straightforward. The offset slot keeps the nail one inch down from the top edge, so I didn’t nick the shingle above while driving.
Removing old nails was fast—drive the claw under, roll and twist, and the nail comes out clean without needing a separate flat bar. The tool’s solid finish and weight give good leverage, though it’s noticeably heftier than a simple pry.
I also appreciated that the package includes 1-inch galvanized roofing nails that install with a hammer; it’s convenient when I’m making small repairs and want one handy kit for nailing and pulling.
4. AJC Hatchet MWT-005-MH 17oz Magnet Roofing Hatchet – Best All-in-One Hatchet
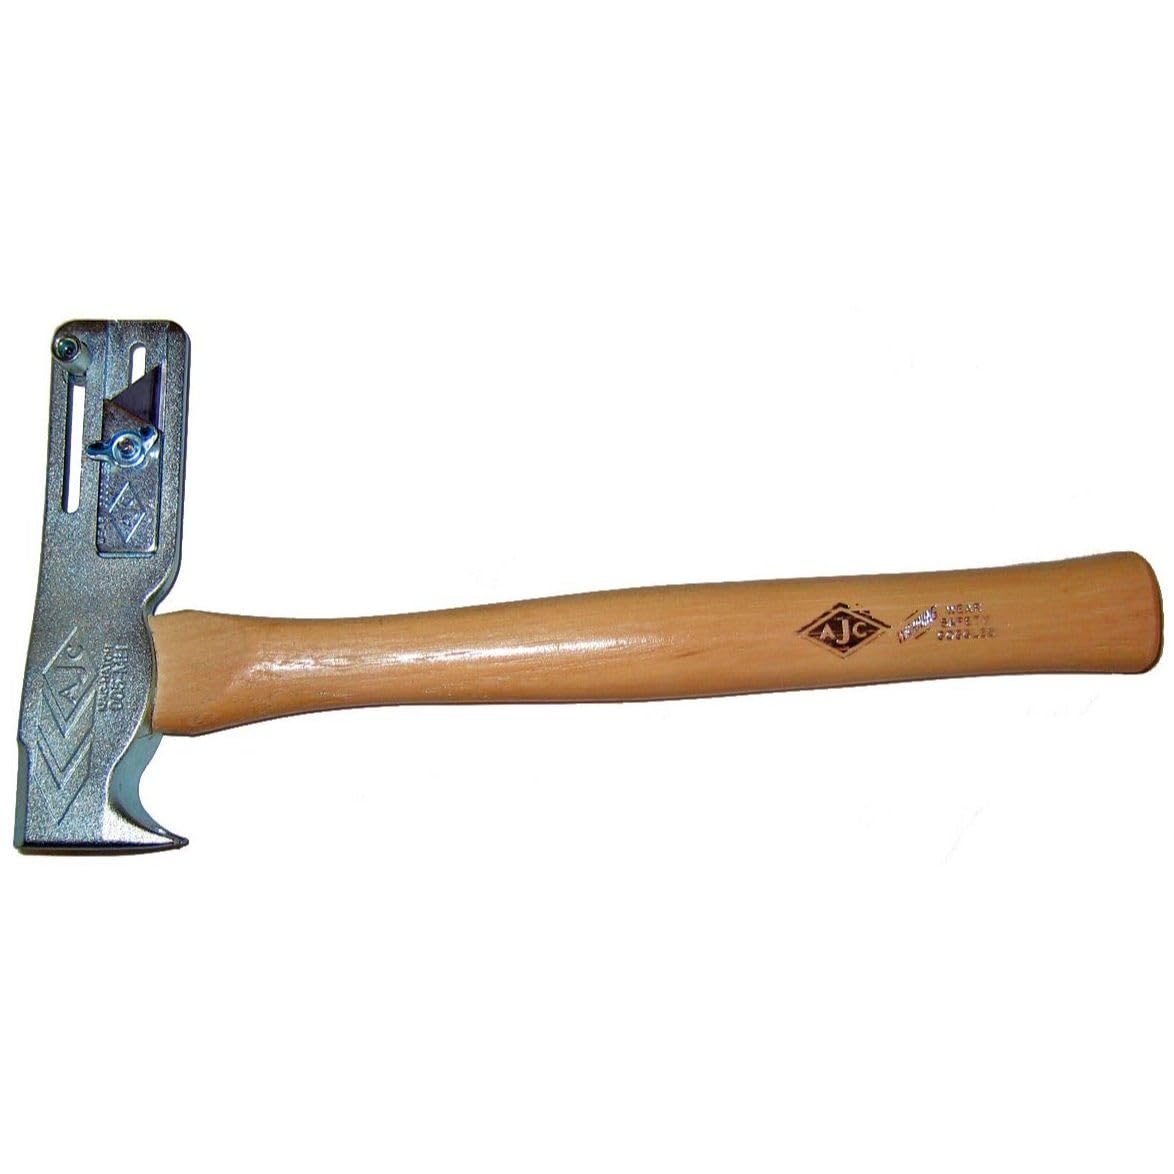
I keep this magnetic hatchet on my belt when I’m nailing cap nails and doing tight roofing work where a compact, multifunction tool helps.
Why I picked it: Magnet, nail claw, and utility blade combine into a single, jobsite-ready tool.
Best for: Cap nailing and small roofing tasks that need a compact tool.
A durable choice that outlasts generic hatchets.
Pros
- Built-in magnet holds nails
- Claw removes crooked caps
- Comfortable, durable handle
- Includes utility blade
Cons
- Not meant for heavy demo
- Some never use the blade attachment
My take
This hatchet is solid and comfortable to use all day. The magnet keeps cap nails within reach, and the claw is excellent for prying crooked caps without switching tools.
I handed copies to helpers because it’s compact and reliable; it’s the sort of hatchet that stays together under normal jobsite abuse and does exactly what I expect for roofing finishing work.
If you want one tool that covers nailing, light prying, and a spare blade for trimming, this is a practical pick to keep in the kit.
5. Vinyl Siding Removal Tool with Extra Long Handle- Steel Blade Vinyl Non-Slip Grip Handle for Installation and Removal Tool Avoid Damaging Vinyl Siding Tool (1) – Best for Vinyl Siding Removal
I used this zip tool to get under lip edges and remove vinyl panels cleanly without damaging the siding.
Why I picked it: Curved tip and slim profile slip under siding lips for clean removal.
Best for: Homeowners and pros removing or re-seating vinyl siding panels.
Very budget-friendly for occasional use.
Pros
- Curved tip grips siding lip
- Non-slip silicone handle
- Lightweight but sturdy steel blade
- Compact and easy to carry
Cons
- Manual tool requires practice
- Slow for large jobs
My take
This siding tool is simple but effective. The curved tip reaches the top and bottom edges and grabs the lip so I can pop panels free without using screwdrivers that tend to gouge.
The 6.25-inch length and silicone handle give enough leverage for small repairs. It’s a must-have for a homeowner toolbox when you need to remove a panel or fit around a new window opening.
For large-scale re-siding I’d still reach for powered solutions or a more ergonomic option, but for spot repairs and reinstallation this tool saved me time and avoided damage to the panels.
6. Liquid Rubber Peel and Stick Seam Tape – Fix Leaks, Repair and Restore Roof Joints and Tears, Bonds to EPDM, Metal, Tiles, Shingles, Wood, and Fiberglass Easy to Use, 4 Inch x 50 Foot Roll 4′ x 50′ – Best for Sealing Leaks

I used this seam tape when I needed an immediate, flexible seal over seams and penetrations that resisted heat and movement.
Why I picked it: Peel-and-stick adhesion that bonds to many roofing materials and flexes under heat.
Best for: Sealing seams, flashing joints, and temporary-to-long-term leak repairs.
A higher-end repair product that pays off when it holds through harsh conditions.
Pros
- Bonds to many surfaces
- Immediate adhesion on a clean surface
- Flexible under temperature swings
- Paintable with Liquid Rubber coatings
Cons
- Packaging can be messy on delivery
- May be a temporary fix in extreme cases
My take
I used the tape on a metal roof seam that had been leaking in extreme heat. After cleaning the area and pressing the tape down, adhesion started immediately and I followed with coating—no seepage afterward.
The material stays flexible in high temperatures and didn’t crack after consecutive hot days. Coating the tape with Liquid Rubber products helped hide the repair and add UV protection.
Packaging on some deliveries has been imperfect; a couple of cans I received leaked. That didn’t affect the product’s performance for me, but it’s something I watch for when opening a new roll.
How I Choose Shingle and Roofing Tools
Types of tools I keep in my kit
I separate tools into categories: fasteners and sealants for repairs, pry and nail-removal tools to replace shingles safely, gauges and clamps for siding or long-board installs, and metal-forming tools for trim and flashing.
Having one reliable item from each category covers most shingle and siding tasks without overpacking the truck.
- Pry tools with offset slots prevent damage to the course above
- Hands-free gauges speed solo installs and keep courses consistent
- Peel-and-stick seam tape is my go-to for awkward leaks
- Metal folding tools give better flashing fits than improvised bends
Material compatibility and durability
I always check what the tool or tape bonds to—EPDM, metal, shingles, wood—and pick products rated for those surfaces.
Durability matters: forged steel and reinforced cams last longer and perform better under repeated use.
- Choose steel-bodied pry bars for leverage and longevity
- Look for non-marring pads when working with pre-finished siding
- Pick seam tapes that stay flexible in seasonal heat
Ease of use and safety
If a tool saves a helper or prevents you from climbing up and down, it’s worth its weight in time saved.
I favor tools that reduce hand strain, provide secure grips, and minimize the need to lever against finished materials.
- Magnetic hatchets keep nails reachable and reduce fumbles
- Gauges that lock reliably let you focus on nailing, not holding
- Practice new tools on a scrap piece before working on finished areas
Frequently Asked Questions
Can seam tape be used on both metal and shingle roofs?
I regularly use peel-and-stick seam tape on metal, shingles, and many other surfaces—after cleaning and drying the area—because it bonds immediately and flexes with temperature changes.
Will a siding gauge work with long fiber cement or Hardie planks?
I’ve used the Gecko-style gauges with long textured lap planks and they held 16-foot lengths securely; just confirm the thickness matches the tool’s specification before relying on it.
Is the Roof Snake heavy to use all day?
The Roof Snake is on the heavier side compared with pocket bars, but that weight gives leverage and durability; I found it comfortable for typical repair sessions.
Final Take
Over years on roofs and siding jobs I’ve learned the right little tools change the game: they protect finished work, let me work alone when needed, and stop leaks before they grow.
These picks are the ones I reach for first when I need dependable performance on shingle and siding tasks.
")