
I tested five roomy, walk-in and pop-up greenhouses so you can pick the right combination of space, durability, and ease of setup for your garden.
I spend a lot of time putting greenhouses up, running plants through freezing nights, and living with each structure through wind and rain. For this roundup I compared five large greenhouse options that balance space, sturdiness, ventilation, and ease of assembly.
If you want a roomy starter greenhouse, a heavy-duty frame that will last, a pop-up for quick protection, or a unit with maximum shelving, I walked each option through real-world assembly and seasonal use so you can choose the best fit for your garden.
I picked these five to cover the common trade-offs: best value walk-in, the most robust frame, the fastest pop-up, the most shelving, and the easiest-to-assemble option. Match your yard and climate to the pick that emphasizes either durability, space, or speed.
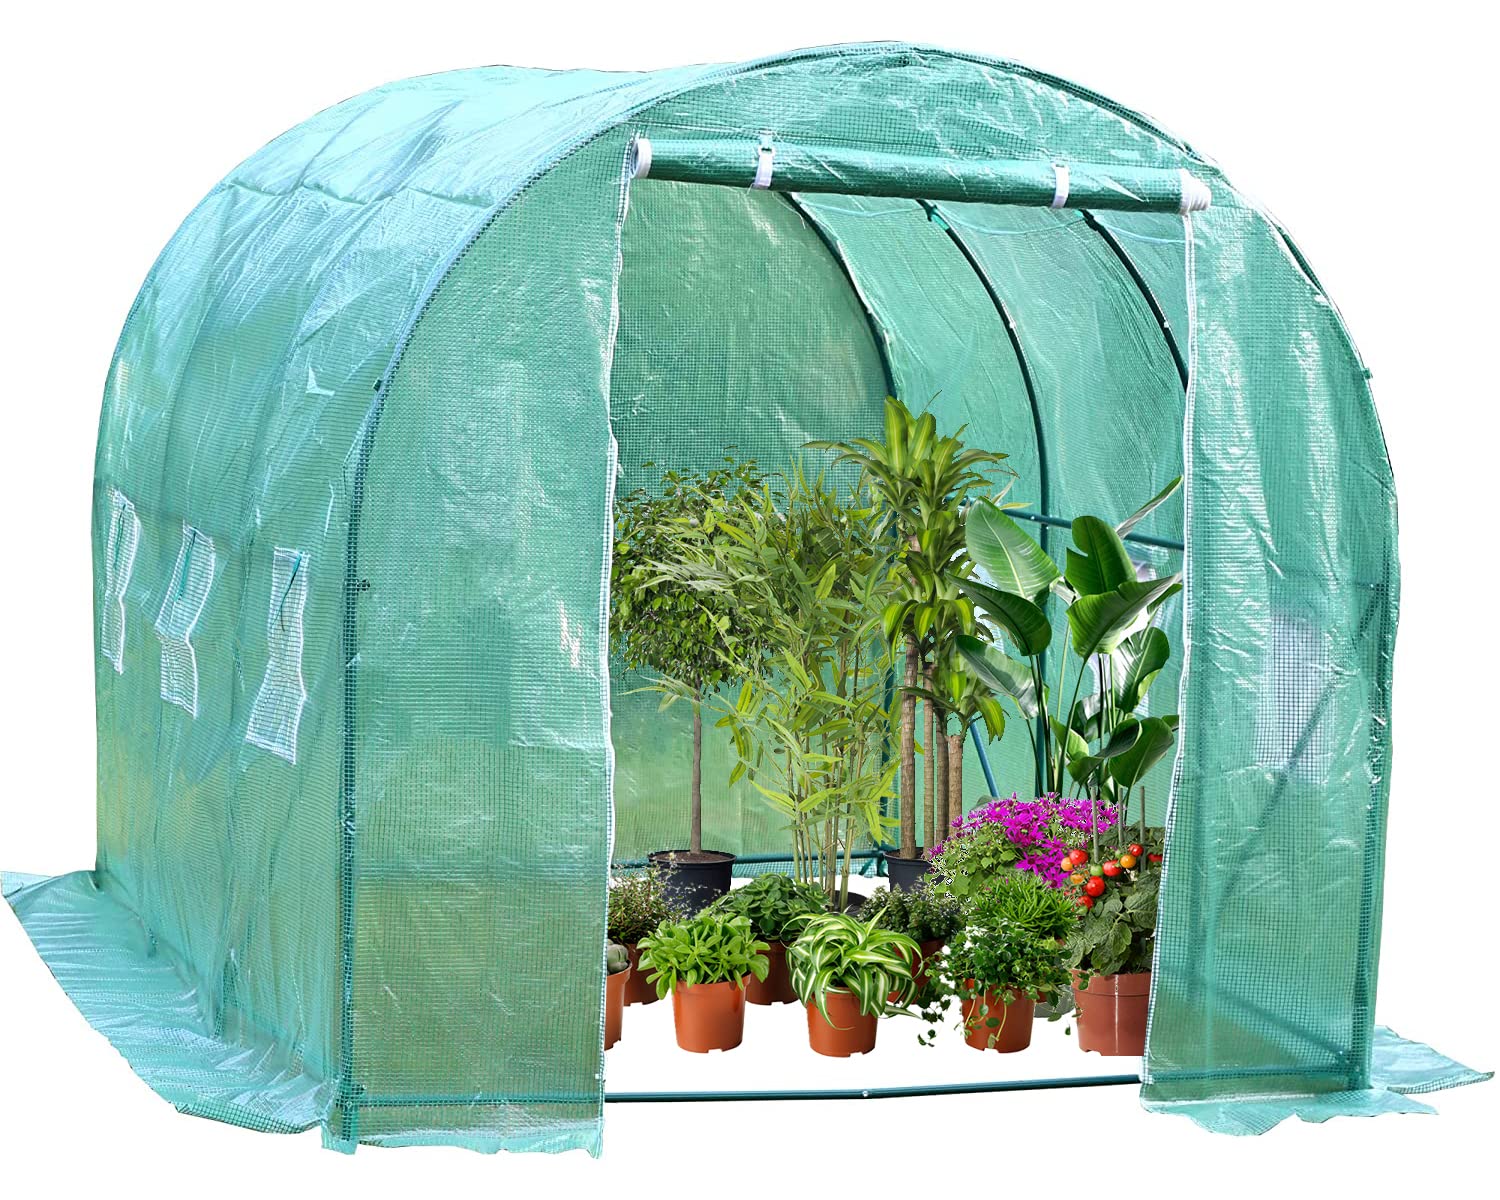
1. Greengro Walk-In Greenhouse – Best Value Walk-In
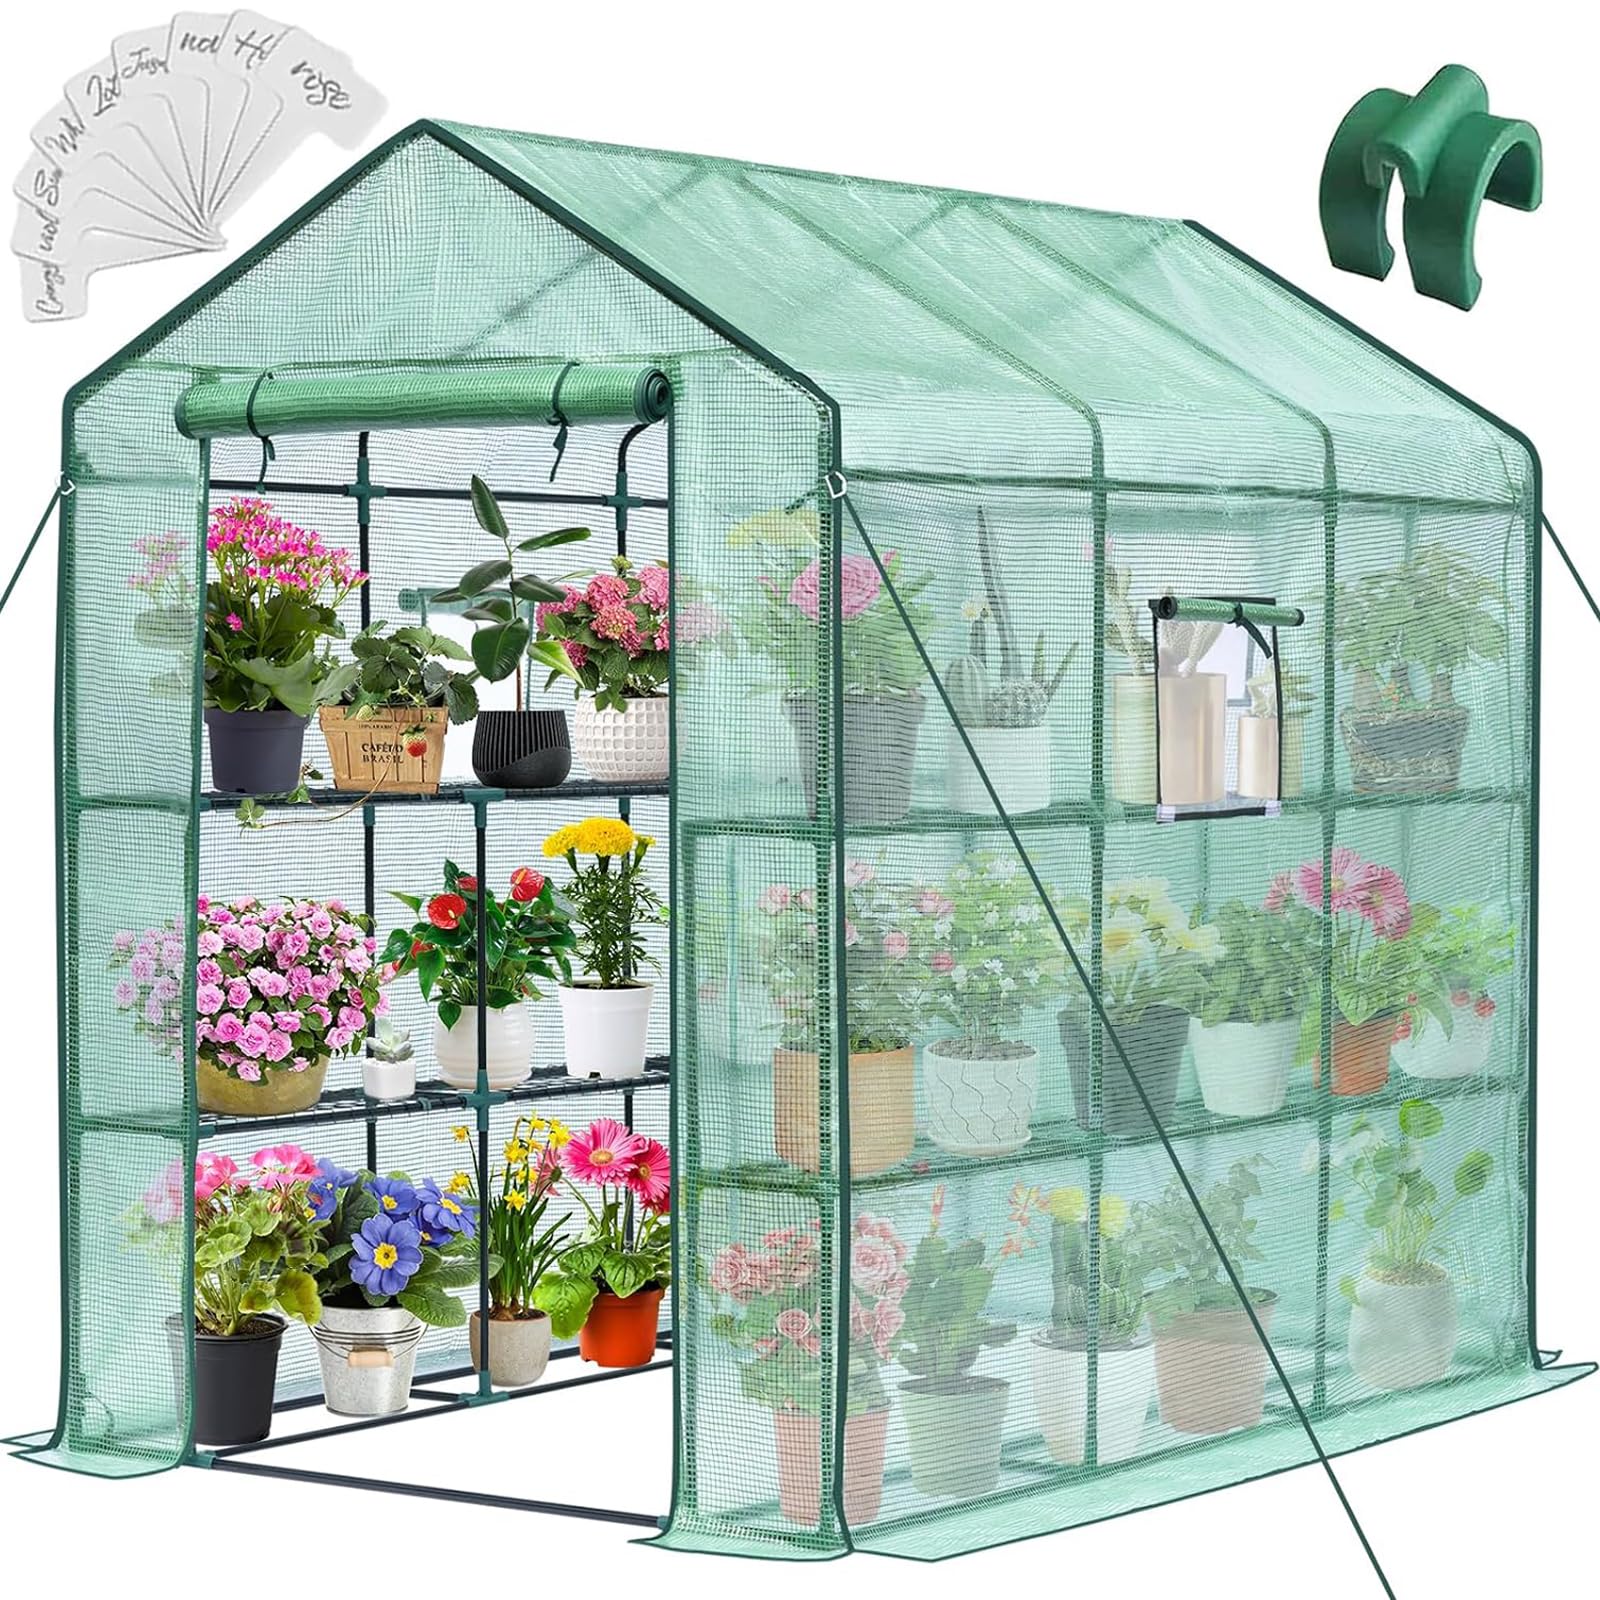
A roomy, affordable walk-in with a thick PE cover, eight shelves, and easy tool-free assembly.
Why I picked it: Great balance of interior space, durable cover, and shelf capacity at an accessible cost.
Best for: Gardeners who want a full walk-in greenhouse with organized shelving without spending a lot.
Affordable option with strong features for the price.
Pros
- Thick, UV-reducing PE cover
- Eight shelves for organized growing
- Tool-free assembly
- Roll-up zippered door
- Side mesh windows for ventilation
Cons
- Included stakes feel lightweight
- Front flaps need extra ties
- Some zippers can be stiff
My take
I found this unit to be the best value for a true walk-in greenhouse. The cover uses a high-tensile grid and double-stranded edge banding that gives the material a reassuring thickness, so the interior holds warmth well.
Assembly was straightforward and tool-free; I had the frame and shelves up in under an hour. The eight shelves make seed starts and pots easy to organize — I could fit dozens of smaller pots without crowding.
The roll-up zippered door and screened side windows make ventilation simple, but I did have to add a few ties to keep the front panels from flapping in strong breezes. The supplied ground stakes are fine for light winds, but I secured mine with extra anchors for peace of mind.
Overall this greenhouse performs well across seasons for sheltered yards and patios. It's roomy, retains heat, and gives you a lot of organized growing area for the money.
2. KING BIRD Galvanized Frame Greenhouse – Best Heavy-Duty Frame
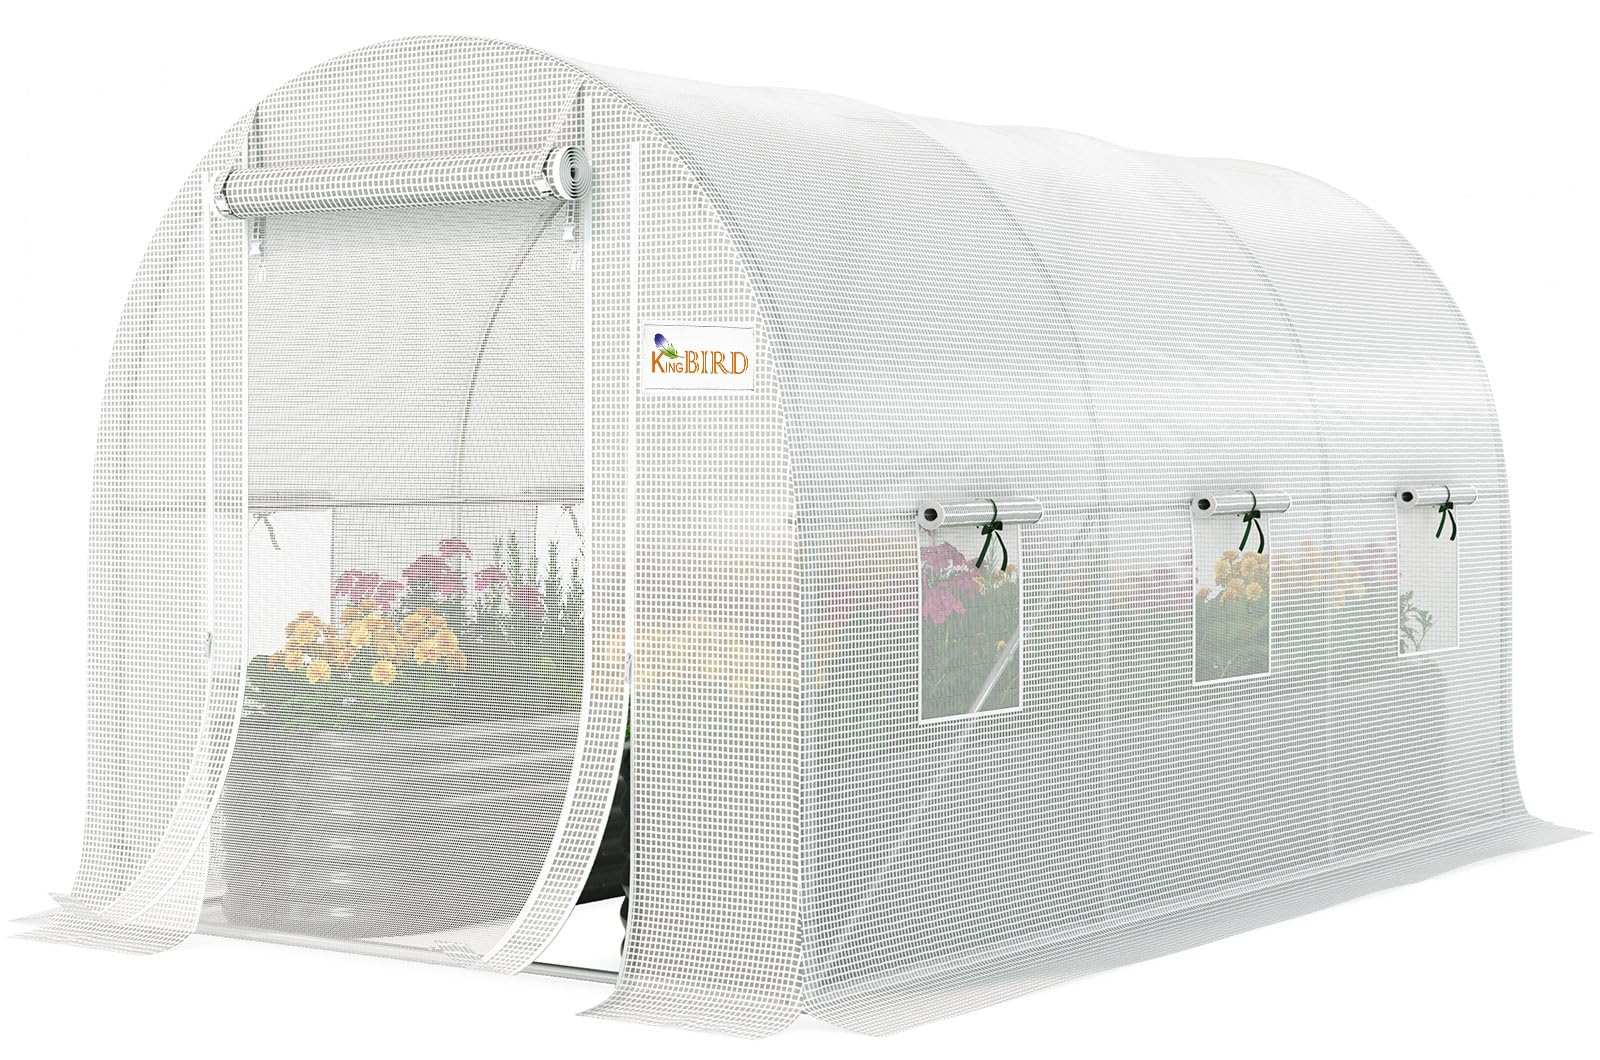
A long, walk-in tunnel built on a 0.7mm galvanized steel frame and a heavier PE cover for extended outdoor use.
Why I picked it: Strong galvanized tubing and a higher‑grade PE cover for people who want a more durable frame.
Best for: Growers who need a longer structure with a sturdy frame for semi-permanent outdoor use.
A mid-priced option that prioritizes frame strength and cover longevity.
Pros
- Thick galvanized steel frame
- High-density UV-resistant PE cover
- Multiple roll-up windows
- Dual PE and screen door
- Extra stakes and guy ropes included
Cons
- Assembly awkward solo
- Zippers and Velcro can wear
- Cover may need replacement long-term
My take
This greenhouse stands out for its frame. The 0.7mm galvanized steel feels substantially stiffer than lighter tube frames, and the extra diagonal supports and multiple bottom poles give the whole structure rigidity once anchored.
The cover uses a heavier 150g/sqm PE with a higher UV rating, so it sits tighter on the frame and holds warmth well. I used the roll-up windows and the two-stage door (PE plus screen) to control humidity and keep pests out without sacrificing airflow.
Putting the frame together was manageable but a little awkward alone; I recommend a second set of hands or a simple base to build on. I also anchored mine heavily — driven pipes and guy ropes made a noticeable difference in stability.
A practical note from longer-term use: the frame stays solid, but zippers and Velcro closures show wear before the steel does. If you want this greenhouse for years outdoors, plan for occasional cover or zipper maintenance.
3. Porayhut Pop-Up Greenhouse Tent – Best Pop-Up
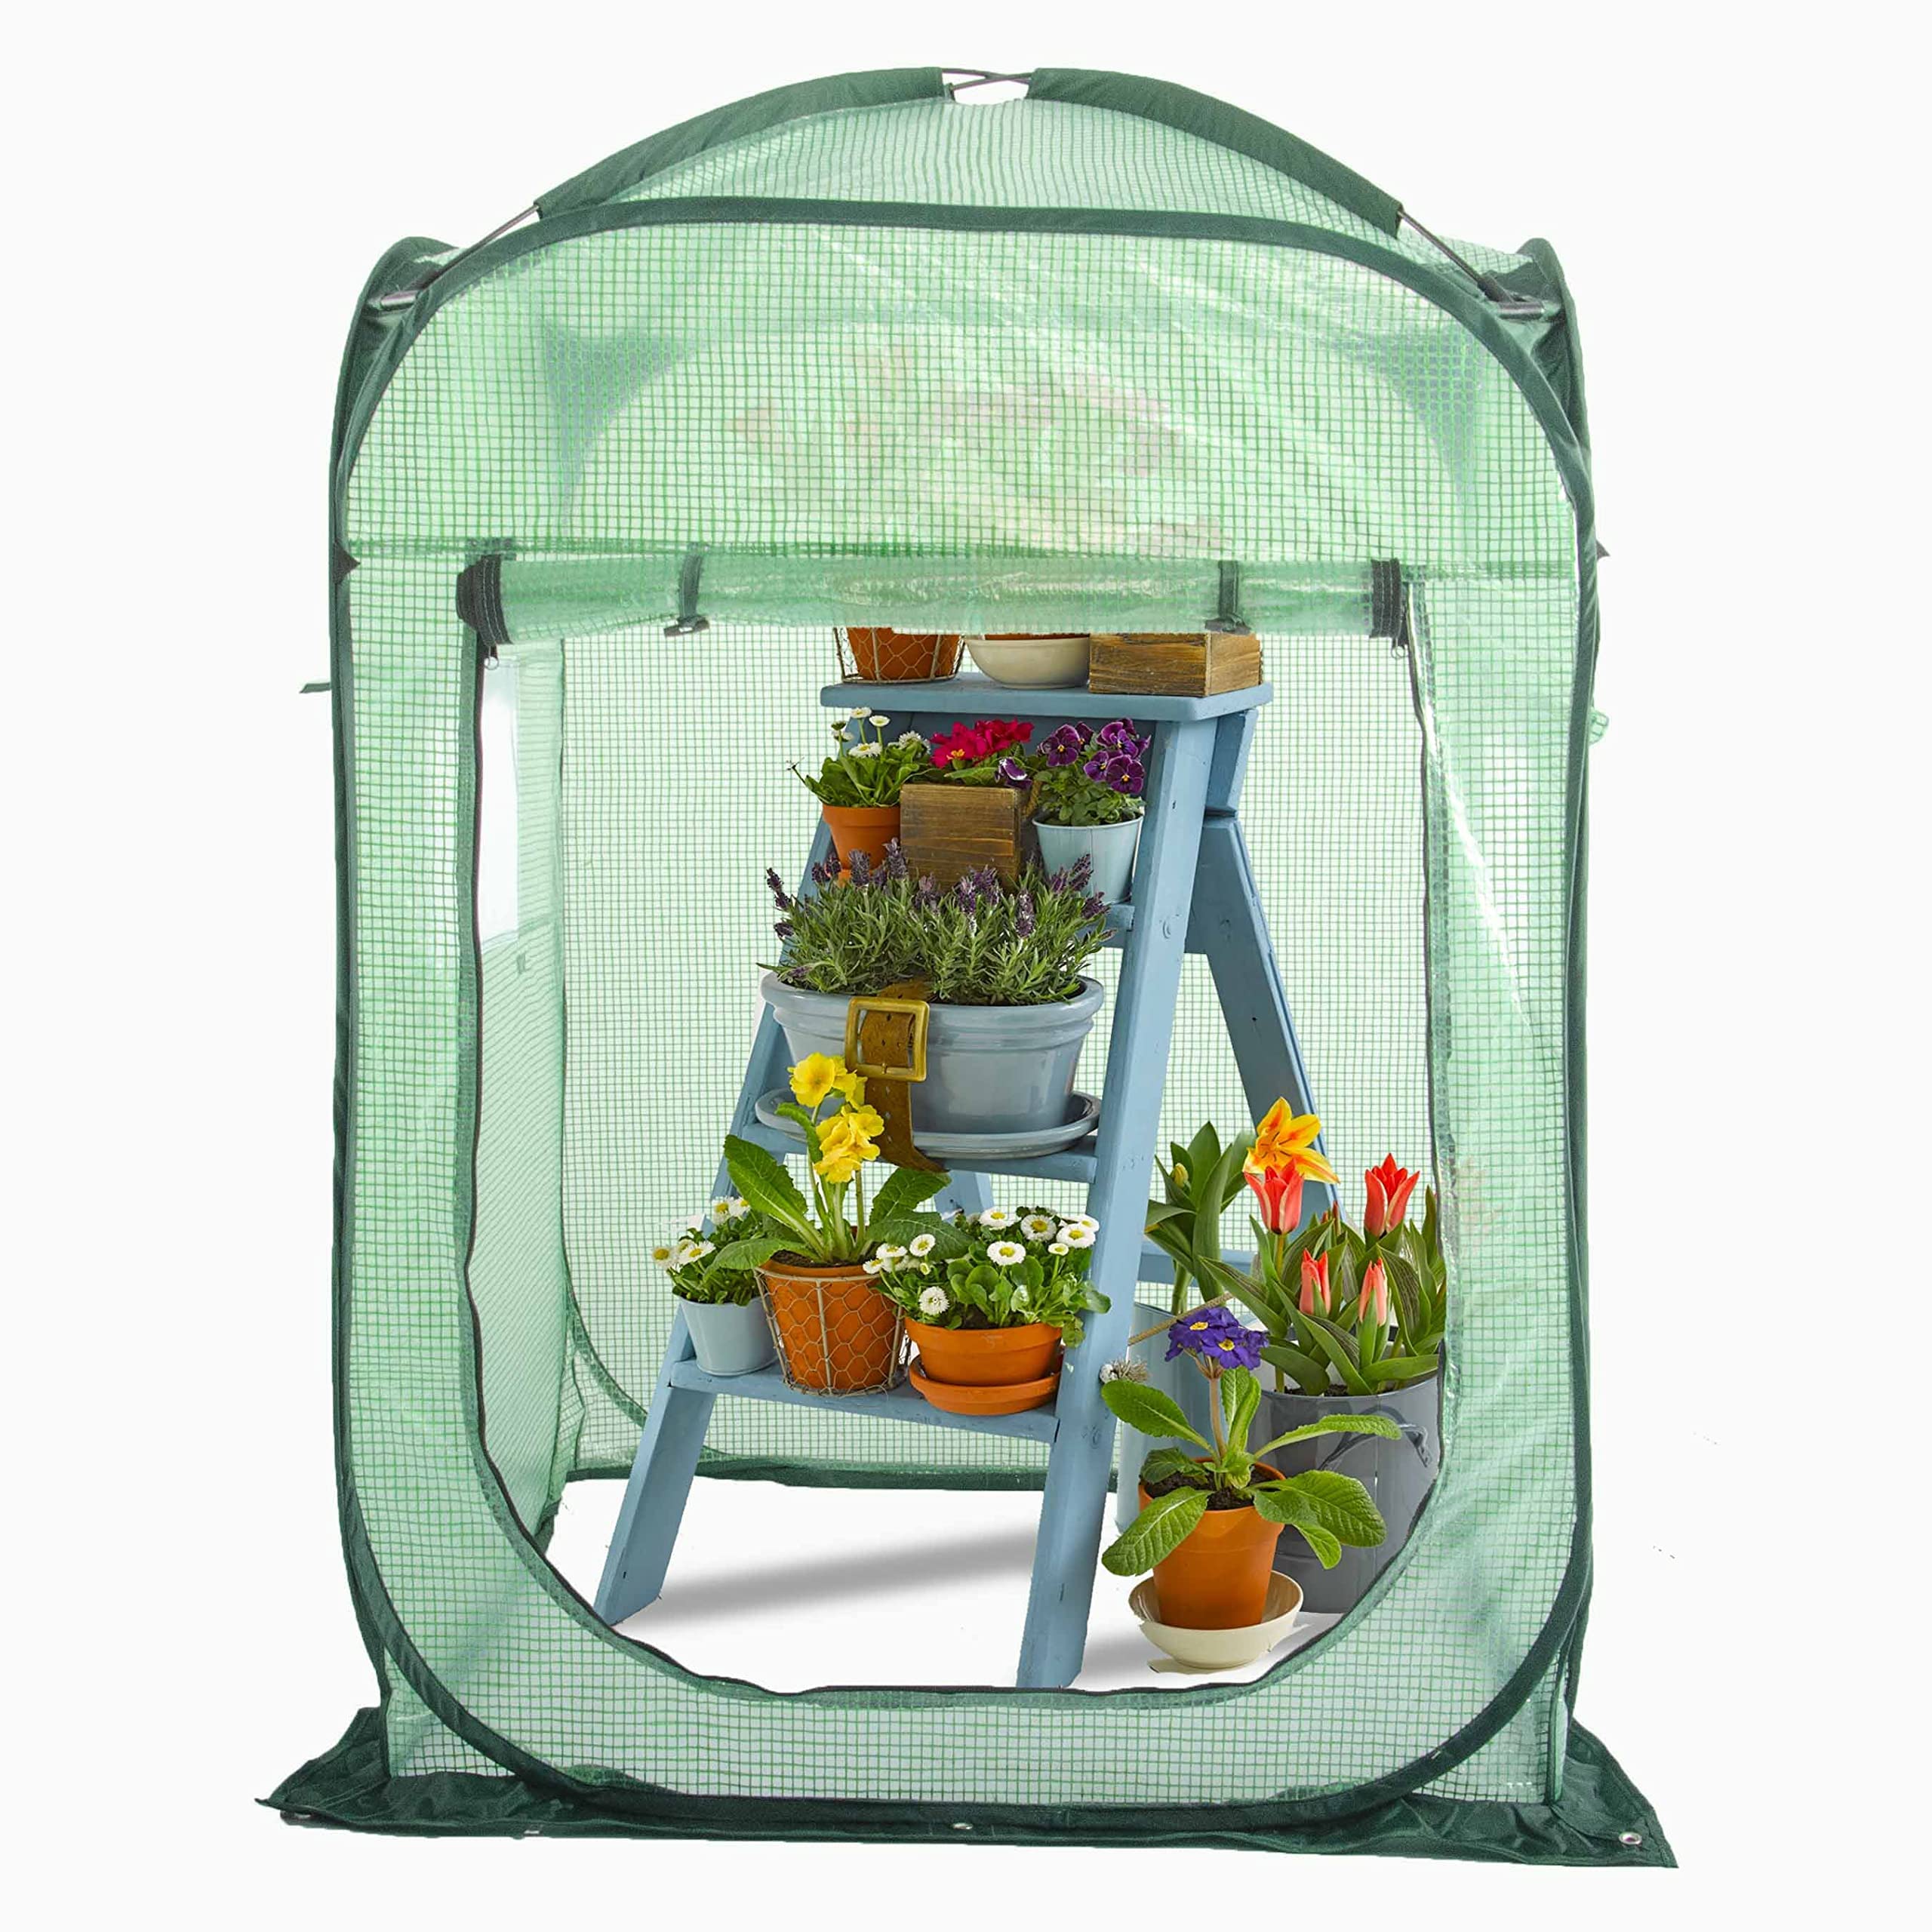
A true pop-up greenhouse that stows compactly, sets up in minutes, and gives instant frost protection.
Why I picked it: Fastest setup and compact storage without sacrificing usable interior height.
Best for: People who need quick protection for several pots or a worktable on patios and balconies.
Budget-friendly and ideal for temporary protection.
Pros
- Sets up in minutes
- Tall center height
- Compact folded size
- Stakes included
- Double-layer PE and Oxford fabric
Cons
- Material not for prolonged heavy snow
- Zipper stress over years
- May need supplemental heat in deep freeze
My take
When I needed something I could deploy in minutes, this pop-up tent delivered. It pops open quickly, the zipper closes easily, and the included stakes help it stay put for short-term protection.
The tall center is a real benefit — I could fit a four-foot table and still stand upright. The fabric blends 600D Oxford with double-layer PE mesh for decent insulation; on cool nights I noticed a measurable temperature lift inside.
This is the sort of unit I use for early- and late-season protection or to shelter a few vulnerable pots. Longevity depends on usage: the materials here are stronger than the cheapest pop-ups, but repeated abrasive use and very cold conditions can stress zippers over time.
If you want a fast, portable shelter that stores small and protects well through light frosts and wind, this pop-up is the most convenient choice.
4. SUNGIFT Walk-In Greenhouse (10 Shelves) – Best for Shelving Capacity
A compact walk-in with ten sturdy shelves, roll-up door, and observation windows for organized seed starting.
Why I picked it: The largest shelving footprint in my test — ideal if organization and vertical space matter most.
Best for: Seed starters and growers who prioritize shelfspace and tidy plant organization.
Affordable shelving-focused greenhouse.
Pros
- Ten sturdy shelves
- Powder-coated steel frame
- Large roll-up door
- Observation windows
- Portable and foldable
Cons
- Must be securely anchored
- Shelves sometimes need zip ties
- Can be wind-sensitive if unweighted
My take
If shelving and organization are your priority, this greenhouse is hard to beat. Ten shelves — including two larger front shelves — let me arrange seed trays, small pots, and tools without cluttering the floor.
The powder-coated steel frame feels robust for its class. I installed the cover and then reinforced shelf connections with cable ties to stop any shifting; that little step made a big difference in keeping shelves flat under load.
This unit benefits from careful anchoring. I once left one lightly staked on an exposed corner and it moved in a strong gust. When weighted with pavers or tied down, it behaves well and provides a predictable microclimate for seedlings.
For anyone running staggered sowings or needing labeled rows, the shelf layout simplifies plant management and saves bench space.
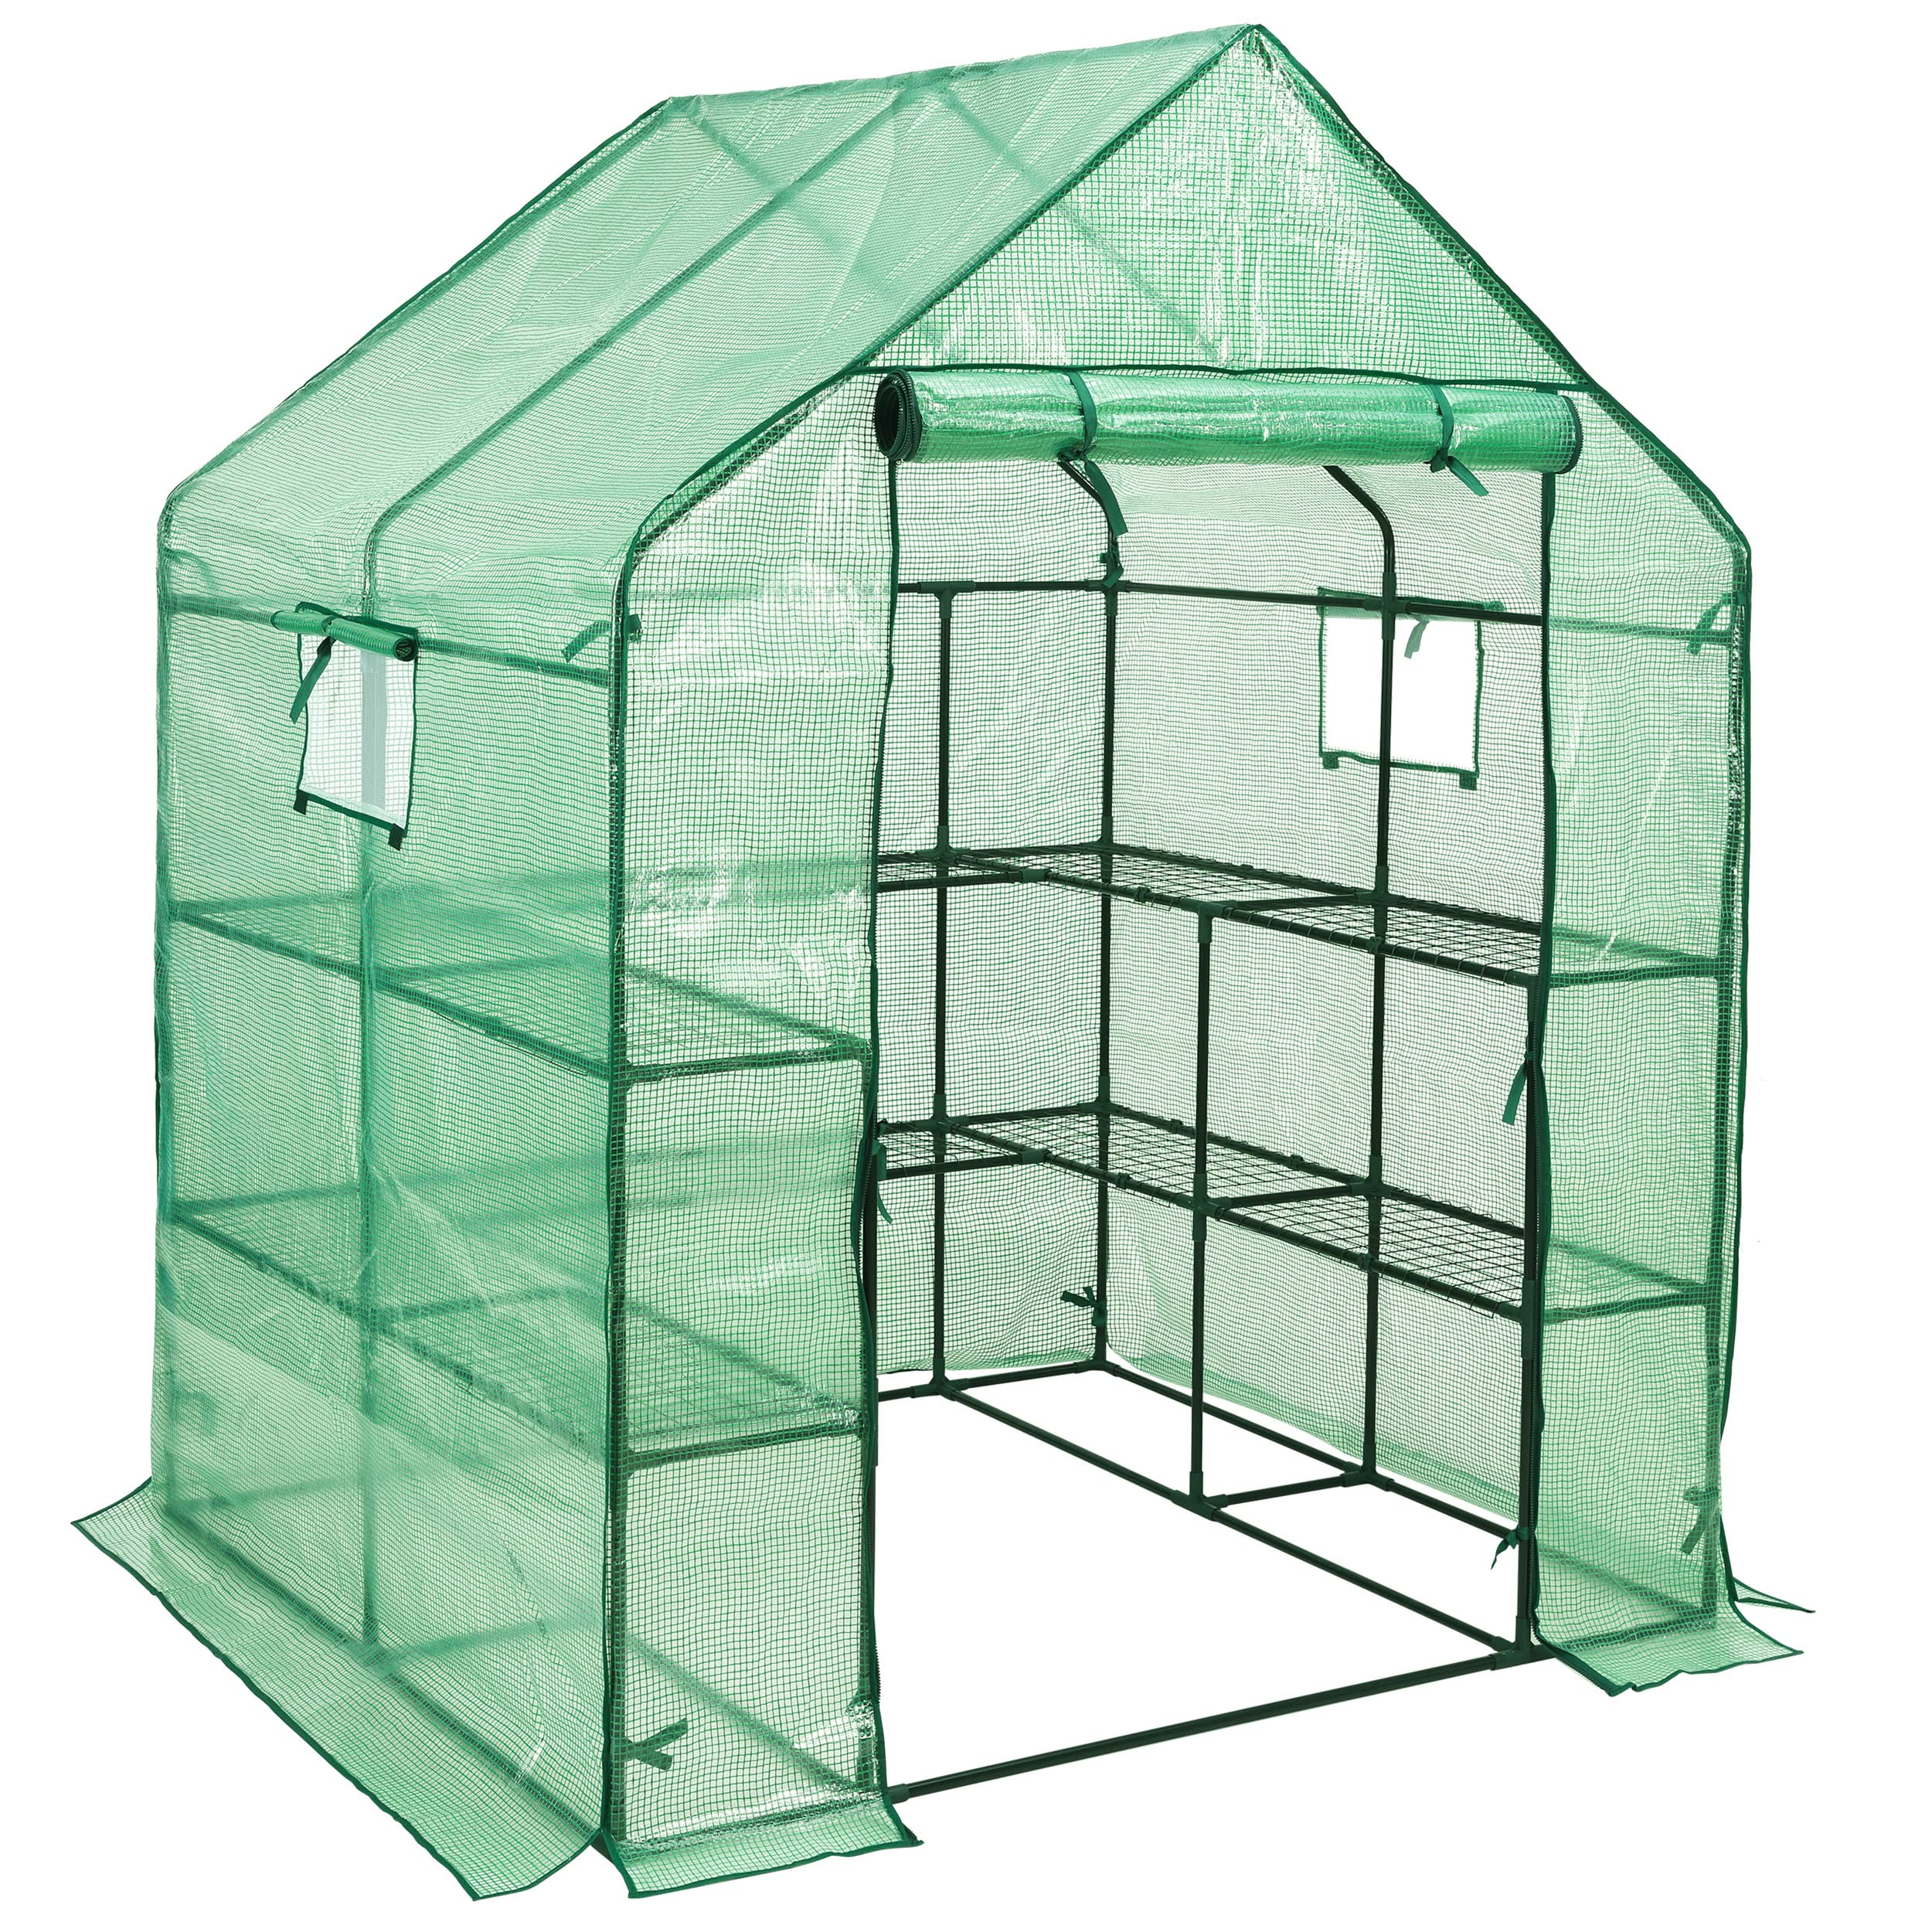
5. FDW Portable Walk-In Greenhouse – Best Quick Assembly
A straightforward tunnel-style greenhouse that goes up quickly, with powder-coated poles and practical vents.
Why I picked it: Fast assembly, heavier poles than some competitors, and useful venting make this an easy daily-use greenhouse.
Best for: People who want a quick-to-build walk-in for wintering tender plants or seasonal use.
Good value with sturdier-than-typical poles.
Pros
- Easy to assemble
- Powder-coated steel poles
- Windows and vents included
- Heavier-duty zippers
- Comes with basic tools
Cons
- Seams can leak in heavy rain
- Some QC variability in covers
- Not a permanent greenhouse solution
My take
This is the simplest walk-in to get running when time is limited. The kit includes the hardware and basic tools, so I had a solid frame assembled quickly with just one helper.
The poles are a touch thicker than the flimsier models I've used, and the zippers feel more substantial than expected for the price. I did tuck seams inward and used a tarp under the floor to manage runoff — seams can let water through in heavy storms.
A caution: I encountered occasional quality variance in covers, so inspect the seams on arrival and keep patching supplies handy. For seasonal protection and winter storage of tropicals, this greenhouse does the job reliably when anchored well.
I recommend positioning it on level ground and weighting the interior rails if you expect strong winds.
How I Choose a Large Greenhouse
Sizing and Layout
Think about what you want to grow and how you'll work inside the greenhouse. I plan bench height, shelf count, and walkways before choosing a model.
Measure the location — overhead obstructions, sunlight angles, and how much room you have to anchor all affect the choice.
- Allow 2–3 ft of workspace around benches for comfortable access
- Choose a taller center if you need to stand upright or fit tall plants
- More length equals more staging space for trays and pots
Frame and Cover Materials
A stronger frame matters if you’re keeping a greenhouse outdoors all year. I prefer galvanized or thicker powder-coated steel for longevity.
Covers range from lightweight PE to heavier grid‑reinforced PE. Heavier, UV-rated covers last longer and hold heat better.
- Galvanized steel frames resist rust and flex less
- Look for grid-reinforced or higher gsm PE for outdoor durability
- Double seams and reinforced zippers reduce failure points
Ventilation and Doors
Ventilation controls humidity and temperature. I always pick models with roll-up windows or screened vents to prevent overheating.
Two-stage doors (PE plus screen) let you balance warmth and airflow without opening the whole structure.
- Multiple vents and roll-up doors improve temperature control
- Screens keep out insects while allowing airflow
- Plan for shade in hot climates to avoid heat stress
Anchoring and Placement
No greenhouse survives long on weak anchoring. I anchor frames with ground stakes, driven posts, or weight the base rails with pavers.
Place greenhouses where they get morning sun and some wind protection — too exposed and you’ll be reinforcing more often.
- Use additional guy ropes or driven rebar for windy sites
- Add pavers or sandbags inside rails to prevent uplift
- Consider a gravel or weed-barrier base for drainage
Seasonal Use and Heating
For extended winter use I add a small heater and monitor night temps. Pop-ups are great for frost protection but may need extra heat in long freezes.
I recommend temperature and humidity sensors so you can adjust vents, shade, and heat proactively.
- Supplemental heat helps in zones with prolonged freezes
- Thermometers and hygrometers keep conditions consistent
- Inspect and reinforce covers before each severe season
Frequently Asked Questions
Do I need to anchor these greenhouses?
Yes — I always anchor a greenhouse. Stakes are often included, but I add driven pipes, guy ropes, or weights to keep the structure stable in wind.
Can these greenhouses handle snow?
Light snow and occasional accumulation are manageable with the heavier-framed models, but I clear snow promptly and avoid relying on pop-ups for heavy, sustained loads.
How much ventilation should I use?
I adjust ventilation by outdoor conditions: more open vents and roll-up doors on warm, sunny days; minimal openings at night unless humidity is a problem. Multiple vent points give the most control.
Final Take
I've tested options that emphasize value, frame strength, speed of setup, shelving, and simple assembly. Your best pick depends on whether you want a semi-permanent structure or a quick seasonal shelter.
For a balanced walk-in with lots of organized space choose the Greengro; if frame durability is critical go with the KING BIRD; pick the Porayhut pop-up for instant protection; choose the SUNGIFT for maximum shelving; and the FDW for the fastest, straightforward assembly.
Decide first on size and anchoring strategy, then match one of these models to your space and climate. Once installed, routine checks of zippers, seams, and anchors will keep any of these greenhouses performing season after season.
")