
I tested a range of cooling options this season—from dual-hose portables and mini-splits to windowless evaporative coolers and a heavy-duty mini-split bracket. Here’s what I’d choose for different rooms, budgets, and use
I spend warm seasons testing and installing every type of home cooling gear I can get my hands on. For this roundup I focused on real-world performance: how fast units cool, how noisy they are, how easy they are to install or move, and whether they fit specific use cases like windowless rooms or whole-home heating and cooling.
Below I walk through the top options I used this year, explain why each one stood out for me, and give practical notes so you can match a unit to your space and needs.
I compared units by function and use case rather than headline BTU numbers, because portability, venting style, and real cooling coverage matter more in everyday use.
1. Pioneer Foldable Mounting Bracket – Best Mini-Split Bracket
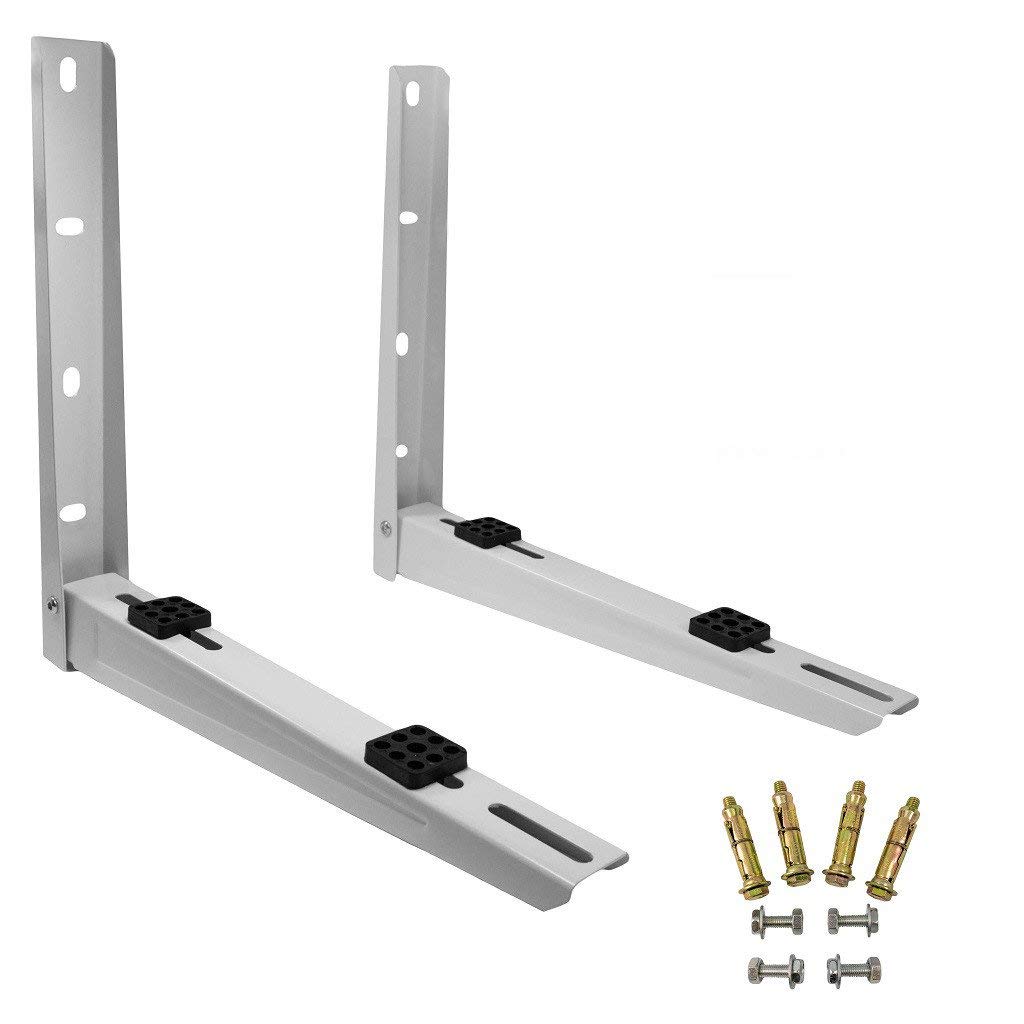
Heavy-gauge galvanized steel bracket for raising mini split condensers off the ground, includes vibration cushions and mounting hardware.
Why I picked it: Sturdy construction and included vibration dampers protect outdoor condensers.
Best for: Homeowners mounting a mini-split condenser on an exterior wall who want a durable, raised platform.
Affordable accessory compared with custom steel work or contractor solutions.
Pros
- Heavy galvanized steel construction
- Includes vibration-absorbing rubber pads
- Comes with wall anchors and hardware
- Folds for shipping and storage
Cons
- Limited side-to-side bolt adjustment
- May require extra washers or washers
- Sometimes needs extra drilling for perfect fit
My take
I used this bracket to raise my mini-split condenser off a dirt pad and it felt robust from the first lift. The galvanized steel and epoxy finish give the impression it will resist weathering for years.
The kit includes most of what you need: masonry anchors, mounting bolts, and four rubber vibration cushions that actually reduce rattle. In my install I appreciated being able to set the rails vertically, level them, then tighten the top fasteners before adjusting the lower bolts.
Two practical notes from my install: the bracket offers only modest lateral adjustment, so if your condenser feet don’t line up you may need to drill extra holes or use longer lag bolts into studs. Also, I sourced a few extra washers and longer lag bolts to secure the unit directly to my studs through the wall—those items weren’t included.
Overall I consider this a reliable, budget-friendly way to protect a condenser from dirt, snow, and flood risk while also taming vibration.
2. 8500 BTU Portable Air Conditioner – Best Portable for Medium Rooms
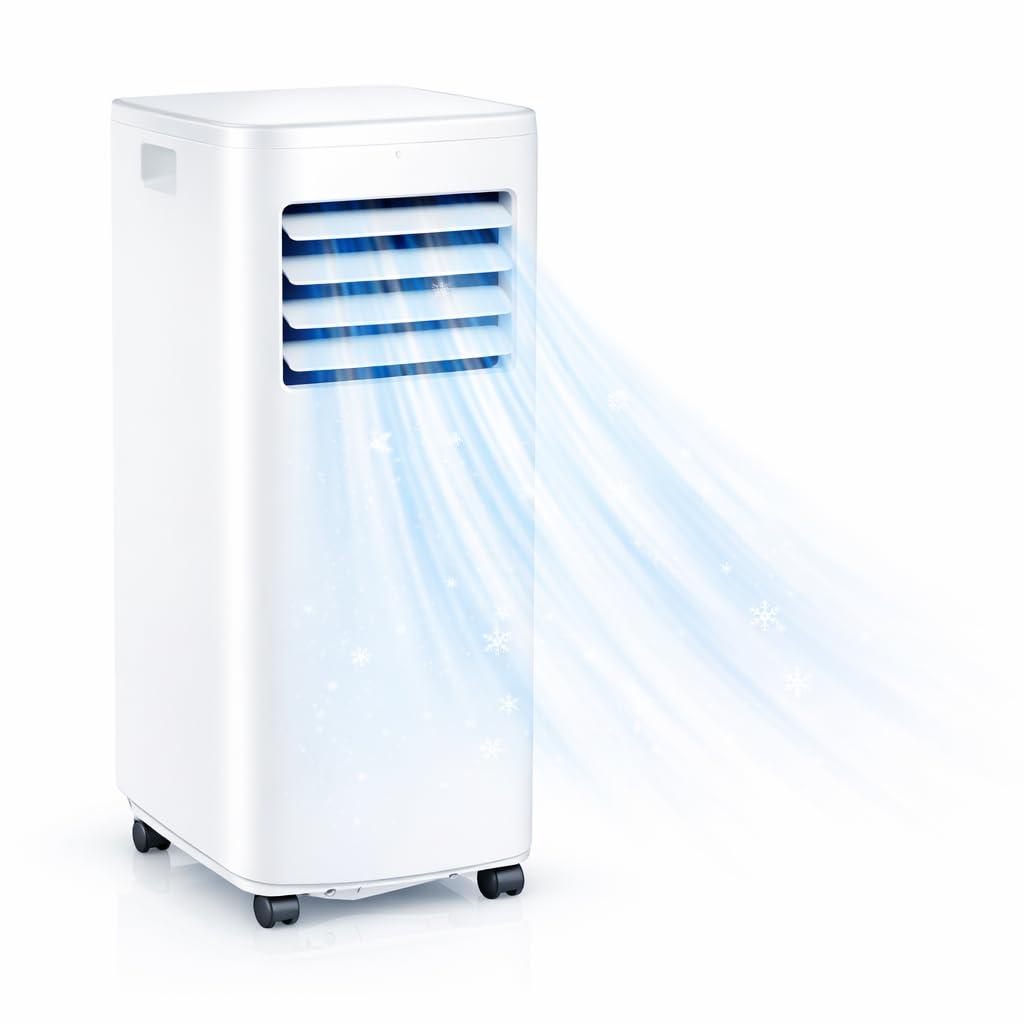
3-in-1 portable AC with fan and dehumidifier modes, quiet operation, and a simple window vent kit—suited to medium rooms and renters.
Why I picked it: Rapid cooling, low noise, and easy mobility made it my go-to for bedrooms and studios.
Best for: Renters, apartments, home offices, and medium open rooms where a window unit isn't practical.
Solid mid-range value for a feature-packed portable unit.
Pros
- Quick cooling in minutes
- Runs quietly under 52 dB
- Three modes: cool/dry/fan
- Smooth-rolling casters and handles
Cons
- Requires window venting
- Cooling area varies with room layout
My take
I rolled this unit into an upstairs art studio that gets unbearably hot and it dropped the temperature noticeably within 10–15 minutes. The dual‑turbo airflow and 61°F low set point mean I could actually work comfortably again.
Setup was straightforward—install the window panel, attach the exhaust hose, and plug it in. The included window kit handled both horizontal and vertical windows without extra parts, which was ideal for a rental.
Nighttime operation is impressive: sleep mode and the sub‑52 dB noise level let me leave it running without disturbance. I also used the dehumidifier mode during humid afternoons and it helped the room feel less sticky.
If you need a moveable, hassle-free cooling solution that’s quieter than most portables, this is one I trusted throughout the season.
3. Senville AURA 12,000 BTU Mini Split – Best Mini-Split System
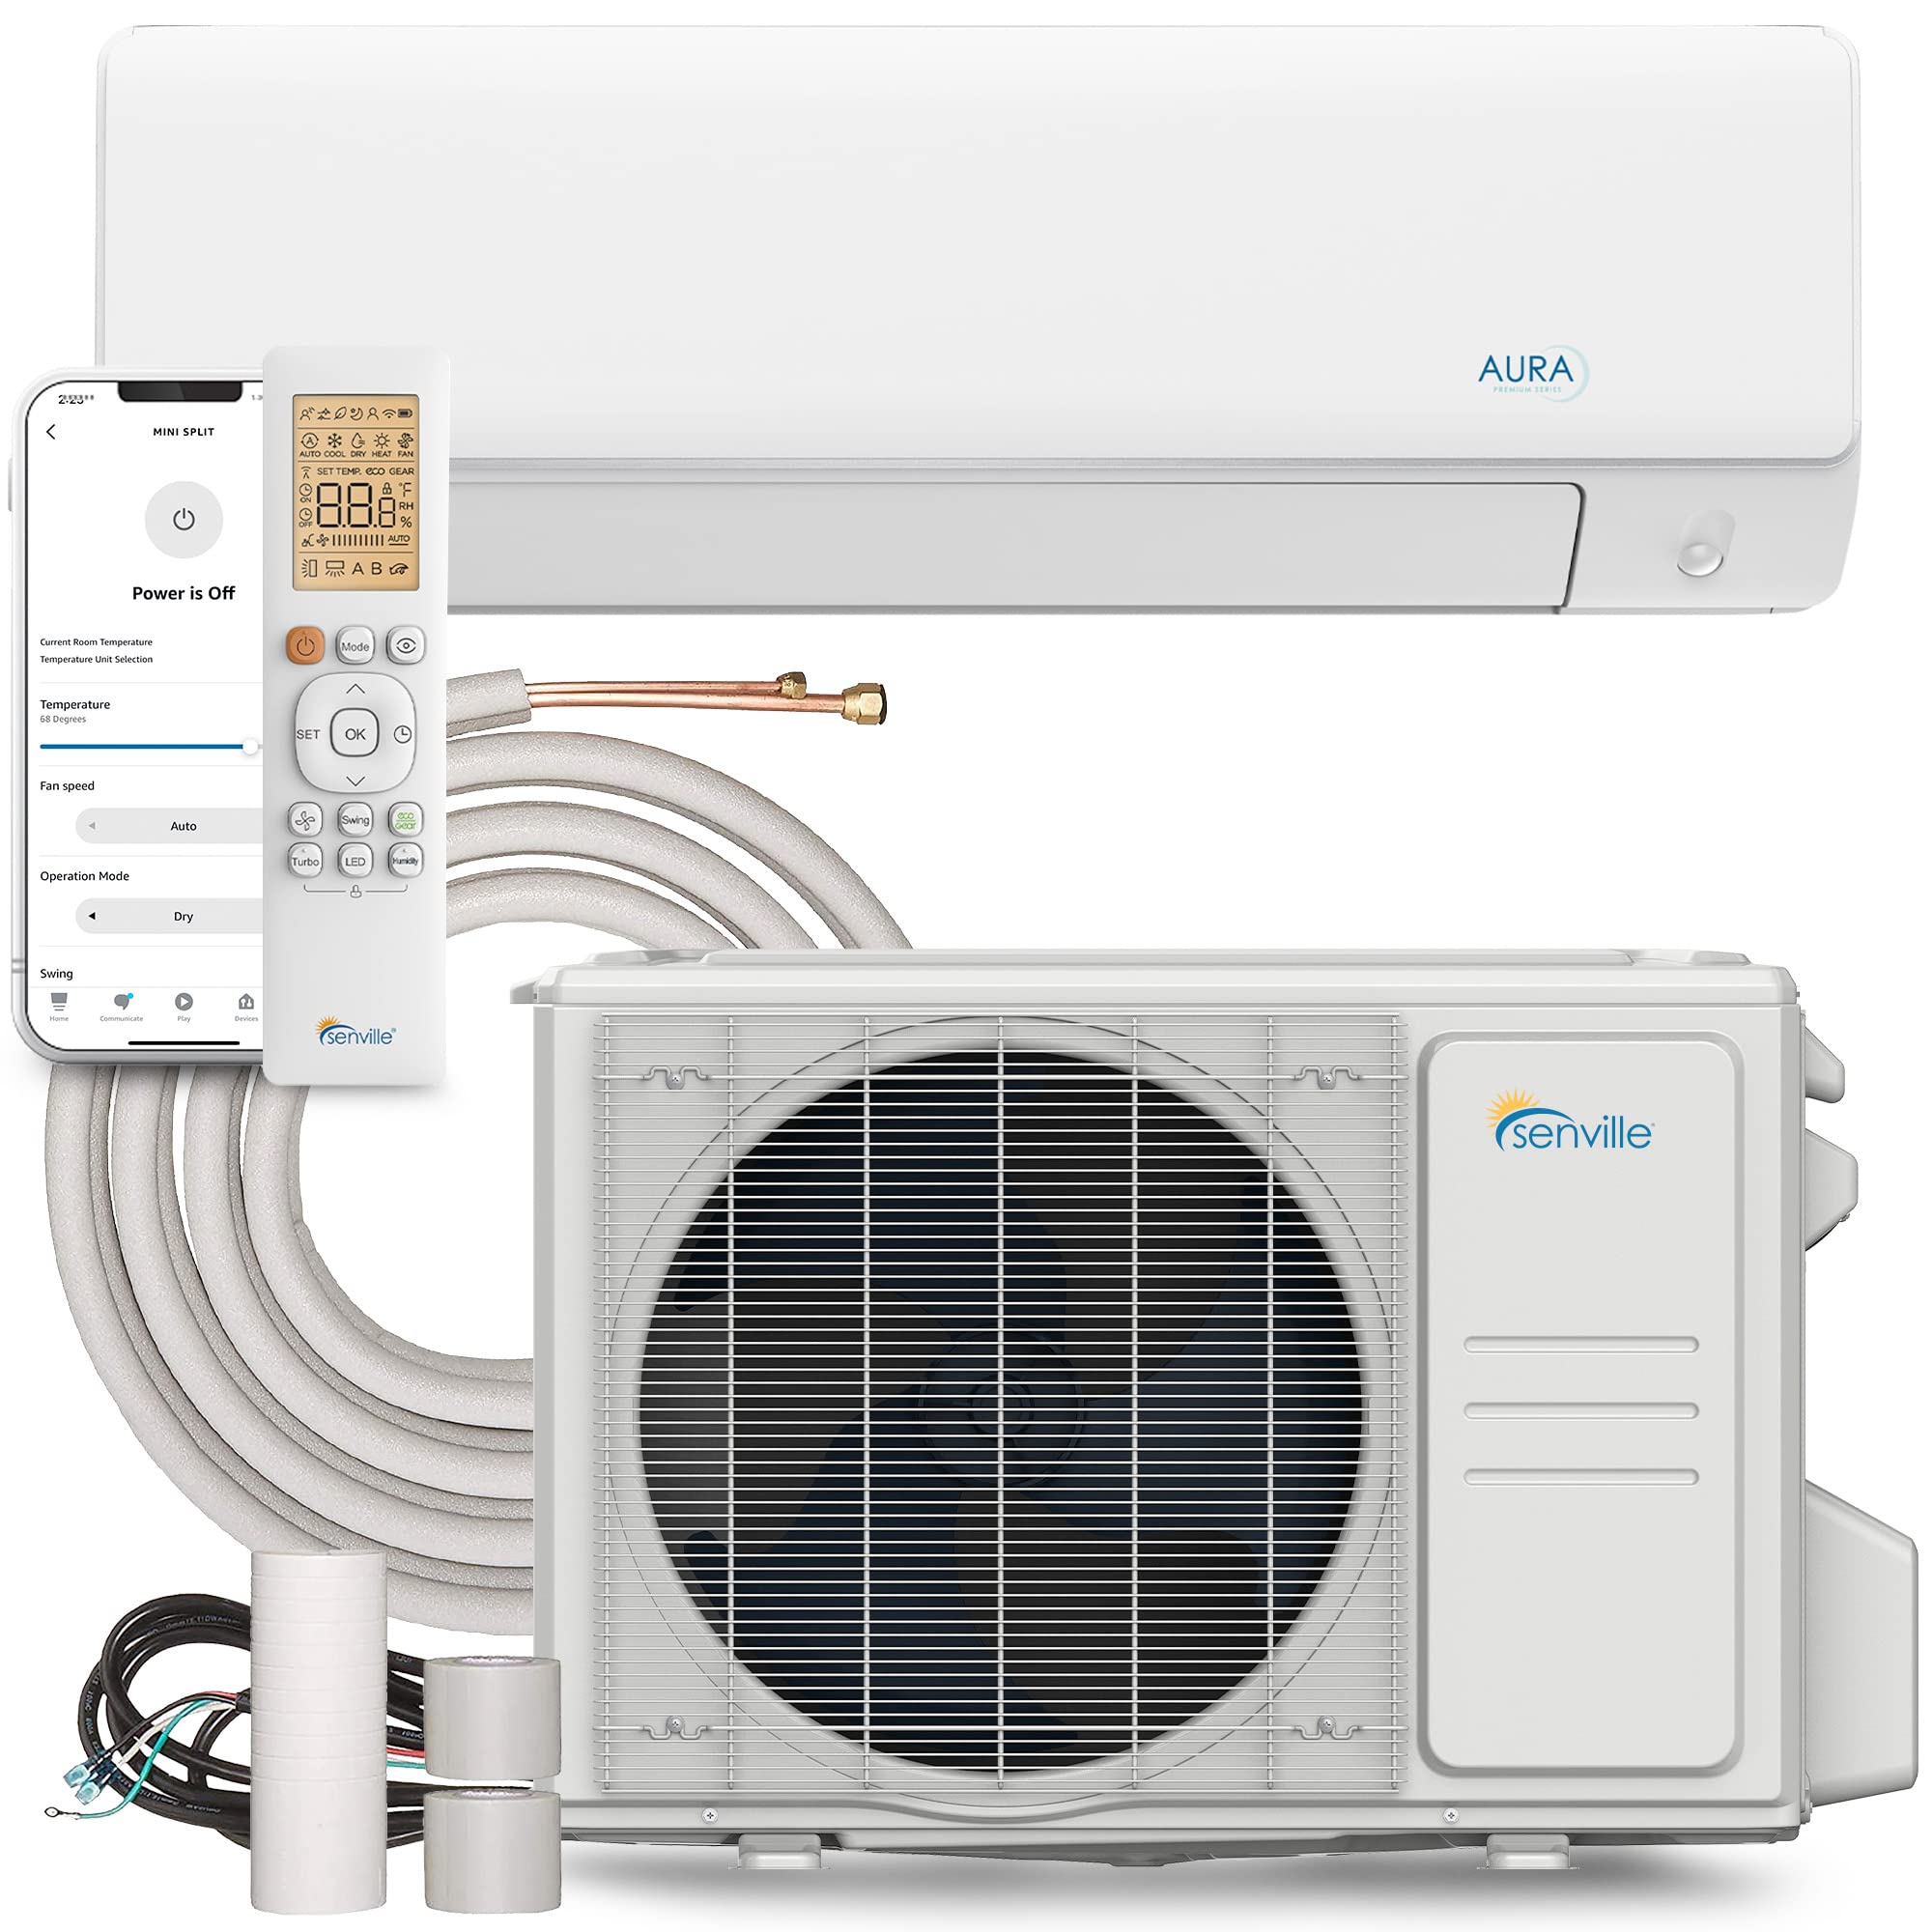
Energy Star-rated inverter mini-split heat pump with heating to extreme cold, smart control compatibility, and a full kit including indoor and outdoor units.
Why I picked it: High efficiency plus reliable heat down to extreme cold made it a top pick for year-round comfort.
Best for: Whole-room heating and cooling in bedrooms, living spaces, cabins, and retrofits where professional install is OK.
A premium investment compared with portable units, but delivers year-round heating and cooling efficiency.
Pros
- Energy Star inverter efficiency
- Works in extreme cold
- Includes indoor/outdoor units and 16ft line set
- Very quiet indoor air handler
Cons
- Professional installation required
- Installation can be time-consuming
My take
I installed this mini-split with professional electrical hookup and an HVAC tech for the final refrigerant work, and the system performed exactly as advertised: whisper-quiet indoors and powerful enough to hold set points even on very cold nights.
The kit comes with a 16-foot line set and the communication wire, which simplified logistics for my project. Expect several hours of work for a proper install—wiring and pressure testing are not trivial if you aren’t already experienced.
I appreciated the inverter compressor: it auto-adjusts and maintains temperature with less cycling, which felt noticeably more comfortable than a wall unit. I also used the Alexa/connectivity features to add simple scheduling routines.
For anyone who wants a long-term heating and cooling solution that’s efficient in extreme climates, this system is one I would recommend—provided you budget for professional installation.
4. Gasbye Dual-Hose Portable AC – Best Dual-Hose Portable
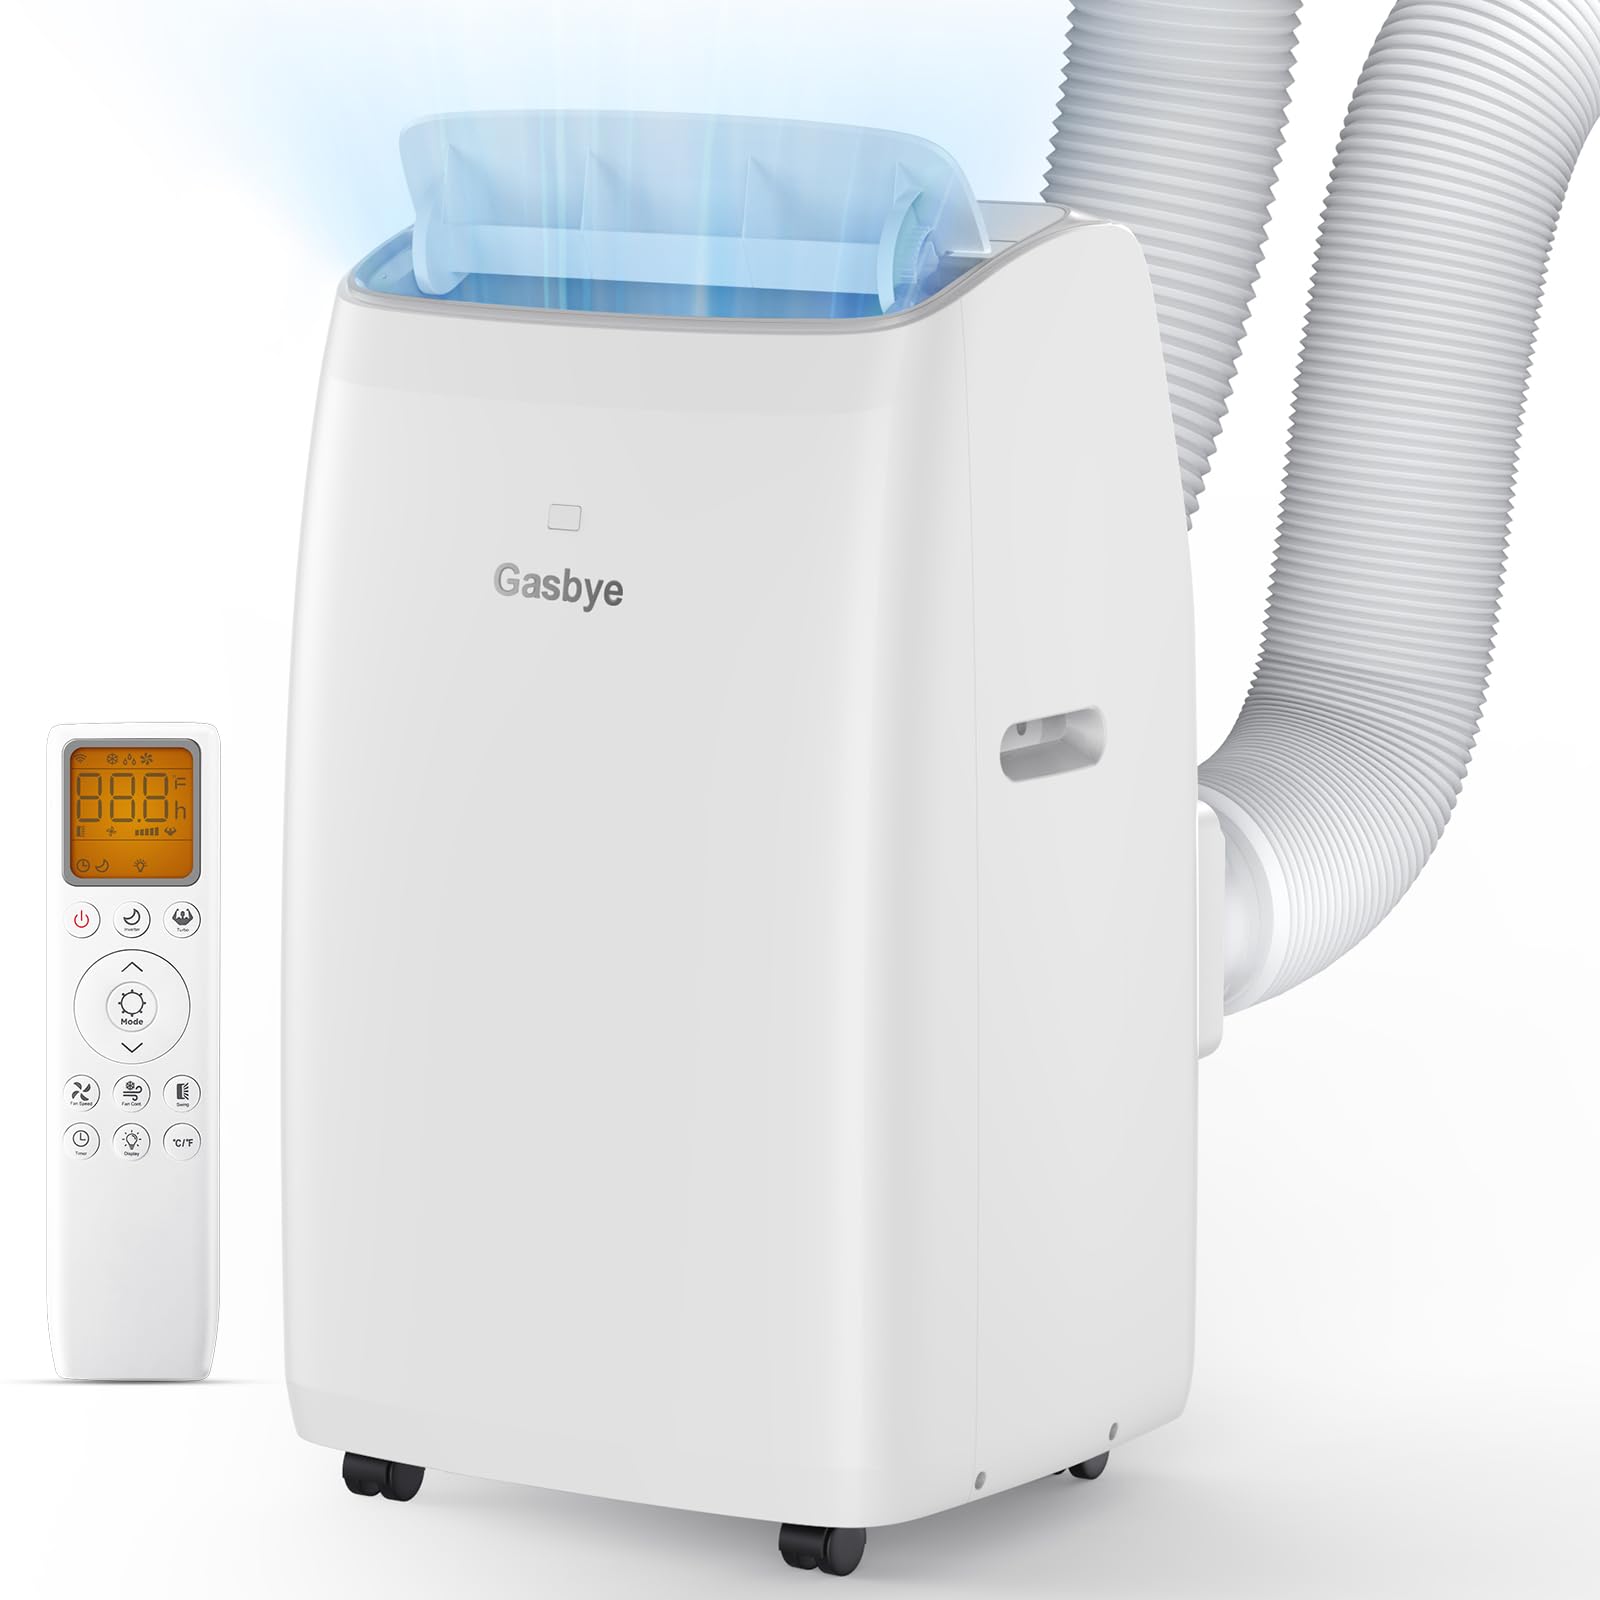
Full DC inverter dual-hose portable AC that balances indoor pressure, delivers efficient cooling for larger rooms, and includes a backlit remote.
Why I picked it: Dual-hose design and inverter tech gave faster, more efficient cooling with lower noise.
Best for: Larger rooms up to 500 sq.ft. and users who want efficient, quieter portable cooling.
Higher-spec portable—priced accordingly but backed by a multi-year support promise.
Pros
- Dual-hose reduces negative pressure
- Inverter compressor for efficiency
- DOE-verified CEER rating
- Relatively quiet operation
Cons
- Heavier, needs two people to move
- Takes up full-size footprint
My take
I used the Gasbye dual-hose unit in a large living area and noticed faster cooling than single-hose portables I’ve tested. The two-hose approach keeps indoor pressure balanced and keeps hot air from being pulled back inside.
The inverter compressor lowers noise and power draw when full power isn’t required—running in inverter mode overnight was noticeably quieter and more efficient than fixed-speed portables.
Installation required two people because the unit is hefty, and I recommend routing the hot exhaust away from the intake hose so the warm exhaust doesn’t reheat the cooling hose. The included instructions and venting pieces are well thought out.
If you want a powerful portable that behaves more like a compact room system than a typical single-hose unit, this one earned its place on my shortlist.
5. MEPTY Windowless Evaporative Cooler – Best Evaporative Cooler (No Window)
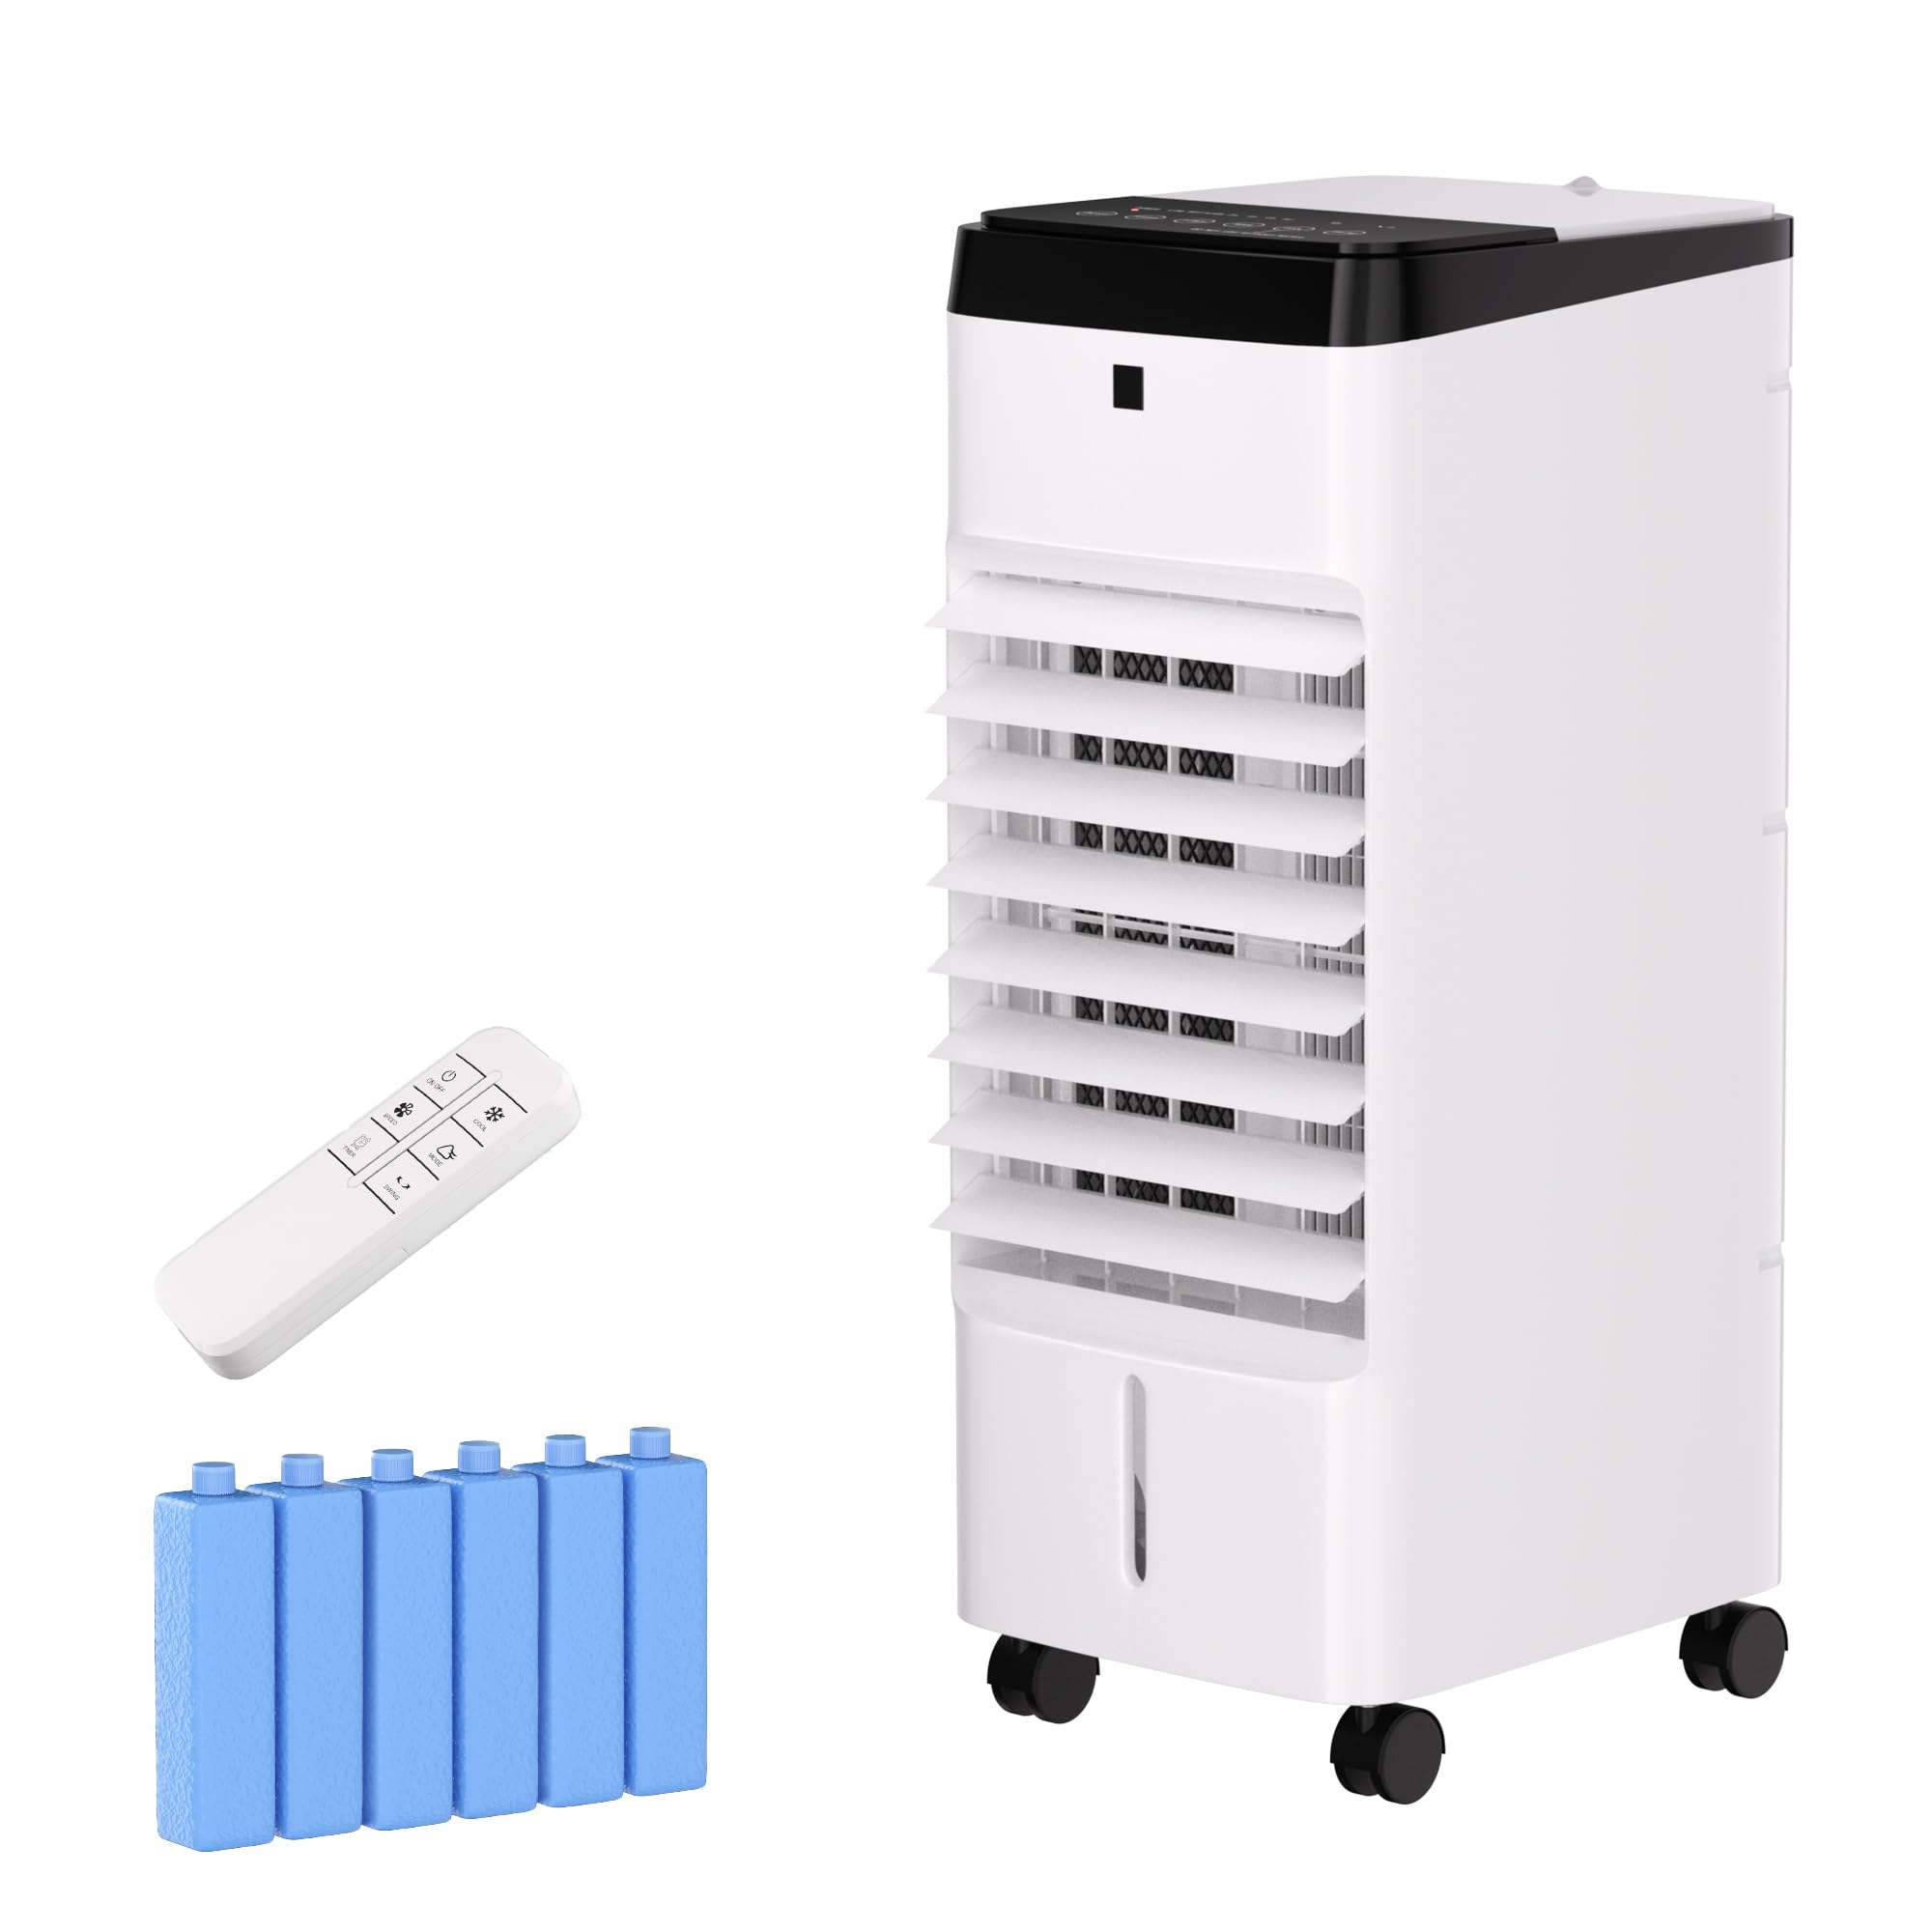
Plug-and-play evaporative cooler that needs no window or exhaust, uses a low-wattage motor and removable cooling pad, and works best with added ice packs.
Why I picked it: True plug-and-play for rooms without windows where a full AC isn’t possible.
Best for: Small bedrooms, sunrooms, or offices that lack window access and can benefit from evaporative cooling.
Very affordable operating cost thanks to low wattage.
Pros
- No hose or window needed
- Very low power draw
- Remote and timer included
- Easy to clean cooling pad
Cons
- Not as cold as refrigerated AC
- Performance depends on humidity
My take
I set this unit up in a bedroom that had no window access and was impressed by how much cooler the room felt with ice packs in the water tank. It’s not a substitute for a mini-split, but it made sleeping comfortable on hot nights.
The unit is plug-and-play—no venting, no assembly—and the removable cooling pad makes maintenance painless. The remote and 12-hour timer made hands-off use easy at night.
Because it’s evaporative, the effect is strongest in drier climates; I found the airflow felt like a cool, humid breeze when the water and ice were cold, so expect something more like a powerful fan with real cooling benefits rather than conditioned air.
6. 35-inch Windowless Evaporative Cooler – Best Tall Evaporative Cooler
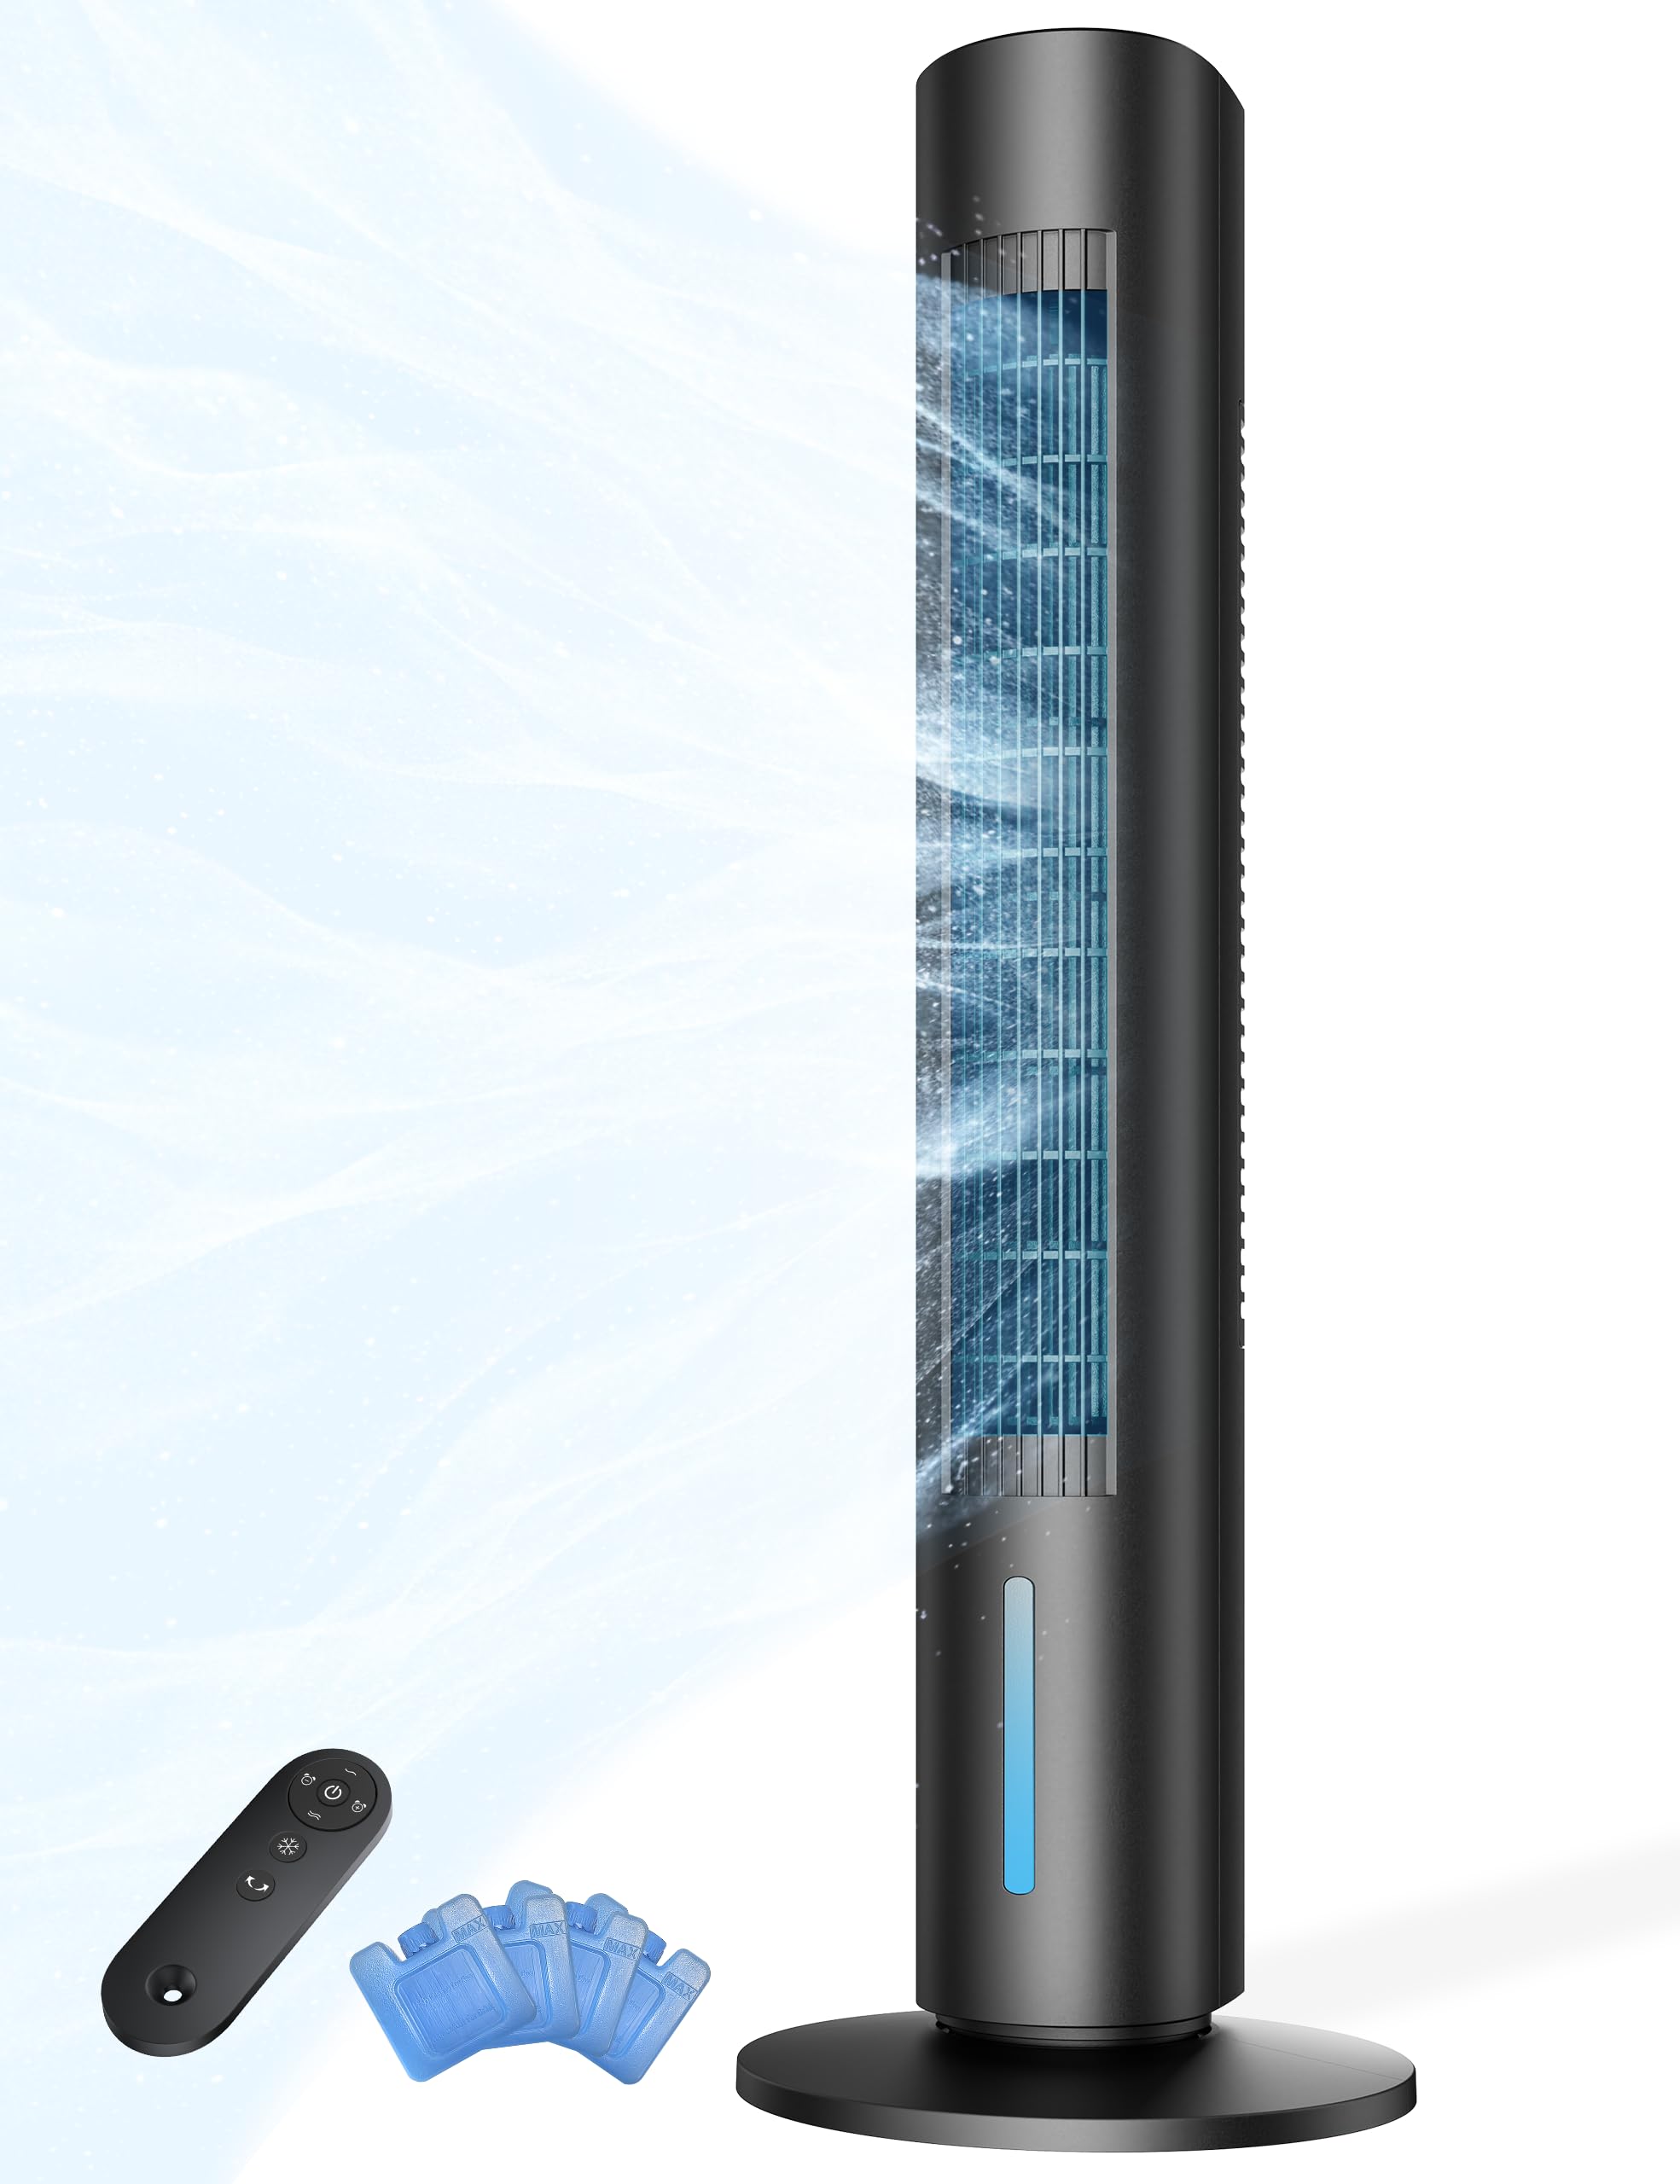
Slim, tall evaporative cooler with a large water tank, wide oscillation, multiple modes, and no need for venting—designed for narrow spaces.
Why I picked it: Tall footprint and wide oscillation spread cool air well in tighter floor plans.
Best for: Dorms, narrow bedrooms, offices, and other small spaces without windows.
Budget-friendly alternative to refrigerated units in small rooms.
Pros
- No exhaust or window needed
- Large water tank for longer runtimes
- 140° oscillation distributes airflow
- Lightweight and easy to move
Cons
- Best performance with ice packs
- Not a full air conditioner
My take
I kept this 35-inch unit in a narrow bedroom and appreciated the tall profile—its outlet sits higher than a tabletop fan, which helps push cool air across a bed or desk.
Adding frozen ice packs to the tank made a meaningful difference: in my dry climate I got a 5–8 degree drop in the immediate blast zone. The wide oscillation covers more of the room so you don’t have to reposition it constantly.
It’s lightweight and simple to move, with a convenient remote and 7-hour timer. If you need a no-vent, space-saving way to get cooler air, this one performed reliably for daily use.
How I Picked and What I Look For
Match the technology to your room
I choose evaporative coolers for windowless rooms and dry climates where low power draw and easy setup are priorities. For renters or short-term cooling, portable refrigerant units win for outright cooling power and flexibility. Mini-splits are my pick for long-term, efficient year-round comfort when you’re prepared for professional installation.
BTU or stated cooling area is only part of the story—venting style, airflow, and the room’s layout matter far more in practical use.
- No window available? Consider an evaporative cooler or a windowless plug-and-play unit.
- Need whole-room, year-round heating and cooling? Budget for a mini-split and professional install.
- Want moveable cooling? Choose a dual-hose portable for better efficiency and balanced pressure.
- Check noise specs and test sleep mode if you plan overnight use.
Installation and placement tips
For wall brackets and outdoor mounts, I always check for sufficient lateral adjustment and plan for extra washers or lag bolts to hit studs. A solid mounting surface is non-negotiable.
Portable units need a clear exhaust path. For heavier dual-hose portables, enlist a helper to move and set them up safely.
- Mount condensers high enough to avoid dirt and flood risk.
- Avoid routing exhaust hoses near intake openings.
- Factor in electrical needs—mini-splits often need 208–230V circuits.
Performance vs. operating cost
I weigh immediate cooling performance against ongoing energy use. Inverter compressors and Energy Star systems typically cost more up front but save on monthly bills.
Evaporative coolers are cheap to run but depend on humidity; in humid climates their benefit is limited.
- Inverter tech reduces cycling and saves energy over fixed-speed compressors.
- If you plan daily use, prioritize efficiency ratings and smart controls.
Frequently Asked Questions
Can evaporative coolers replace a regular air conditioner?
In my experience, evaporative coolers can make a room noticeably more comfortable in dry climates, but they won’t reach the same low temperatures or dehumidify like a refrigerant-based AC. I treat them as a low‑cost, low‑power alternative rather than a full replacement.
Do dual-hose portables actually cool faster?
Yes—when I compared them to single-hose units in the same room, the dual-hose models cooled more quickly and avoided the negative-pressure effect that pulls warm air in from other spaces.
Is professional installation required for mini-splits?
I recommend professional installation for mini-splits. While a handy person can handle parts of the job, proper refrigerant handling, vacuuming, and electrical hookup are best done by a licensed HVAC technician to ensure performance and warranty coverage.
Final Take
I tested everything from simple plug-and-play coolers to full mini-split systems so you can pick the right tool for the job. If you want fast, flexible cooling with minimal installation, go with a portable or a dual-hose unit.
If you need long-term efficiency and year-round heating and cooling, a properly sized mini-split is worth the investment. And for protecting outdoor condensers, a sturdy bracket like the Pioneer bracket is an inexpensive upgrade I always install.
If you want help narrowing this list to your specific room size, window type, or installation constraints, tell me the details and I’ll point you to the right option.
")